Ademco - Vista 120 Programming Form (Australian)

File Preview
Click below to download for free
Click below to download for free
File Data
| Name | ademco-vista-120-programming-form-australian-8497135062.pdf |
|---|---|
| Type | |
| Size | 711.61 KB |
| Downloads |
Text Preview
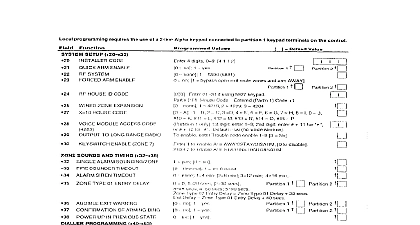
VISTA 120 SECURITY SYSTEM SCHEDULING Form Worksheets Rev B 6 99 OF CONTENTS PROGRAMMING PROCEDURE OF PROGRAMMING COMMANDS FIELD CATEGORIES SINGLE PARTITION PROGRAMMING FORM MULTIPLE PARTITION PROGRAMMING FORM PARTITION SPECIFIC FIELDS PROGRAMMING FORM WITH 93 MENU MODE LAYOUT WORKSHEETS purpose of this document is to provide a quick and easy way to programme your VISTA 120 A recommended programming procedure is included followed by a list of programme fields with corresponding programme group they belong to Systemwide partition specific scheduling etc the programme forms are system layout worksheets We recommend that you use these to plan your system before programming is performed If you need further information about programming options see the VISTA 120 INSTALLATION INSTRUCTIONS Partition System The system default is for a single partition system If you are setting up a single partition system partition specific fields become Systemwide fields Follow the steps outlined on page 3 of document for proper programming procedure System If you are setting up a multi partition system you must enter the number of partitions you are in data field 2 00 Follow the steps outlined on page 3 of this document for proper procedure sure that one keypad is connected to the control and is set to device 00 2 PROGRAMMING PROCEDURE following is a step by step procedure recommended for programming your VISTA 120 system keypads other peripheral devices addresses factory defaults by pressing 97 will automatically enable keypad addresses 00 03 so be sure at least one is set to one of these addresses Systemwide global data fields the programming form as a guide enter programme mode and all systemwide programming fields These options affect the entire regardless of partitions They include control options downloader and options RF options event logging options etc that field 2 00 number of partitions field 1 32 RF type must be programmed before continuing partition specific fields fields can have different values for each partition When the fields have been programmed programme all partition specific fields by first pressing 91 to select a partition while still in data programme mode Then enter the first partition specific field number 09 next partition specific field will automatically be displayed when you are entering the value for field 09 To programme the fields for the next press 91 enter the desired partition number then enter field 09 93 Menu Mode for device programming to the DEVICE PROGRAMMING section of the Installation Instructions to keypad ID numbers and default partitions for each keypad and to suppress certain keypad sounding options Also use this mode to RF receivers relay modules and the VIP module 93 Menu Mode for zone programming to the ZONE PROGRAMMING section of the Installation Instructions to zone response types assign right loop zones and wireless zones zones to partitions and to programme alarm report codes 93 Menu Mode for programming relays to the RELAY PROGRAMMING section of the Installation Instructions to desired relay operation Communication options to the COMMUNICATION PROGRAMMING section of the Installation to load communication defaults and to programme related fields use 93 mode to programme report codes if necessary 93 Menu Mode for programming alpha descriptors to the ALPHA PROGRAMMING section of the Installation Instructions to zone and partition descriptors and a custom installer message 0 Use 93 Menu Mode for programming relay voice descriptors and word substitutes to the RELAY VOICE DESCRIPTORS section of the Installation for further instructions for programming relay descriptors to be by the 4285 VIP module as well as the CUSTOM INDEX section custom word substitutes 1 Use 80 Mode for programming schedules to the SCHEDULING section of the Installation Instructions to programme schedules temporary and holiday schedules limitation of access and time driven events 3 2 Define user access codes to SECURITY ACCESS CODES section of the Installation Instructions to authority level O C reporting option partition assignments and key assignments for each user 3 Exit Programming Mode programming mode by pressing either 98 or 99 A second entry of 99 is if the exit is being done from fields 1 00 and above prevent re access to Programming mode using the Installer code use The only way to re access Programming mode is by depressing both the and keys at the same time within 30 seconds of power up by using 99 always allows reentry into Programming mode using the code Either way of exiting will allow access via downloading Note if local programming lockout is set via downloading programming mode be entered at the keypad OF PROGRAMMING COMMANDS To enter programme mode enter installer code 8 0 0 0 To set standard defaults press 97 To set communication defaults press 94 one of the following 80 low speed 81 Ademco 82 Ademco Expanded High Speed 83 Ademco Contact ID To change to next page of programme fields press 94 To return to previous set of fields press 99 To erase account phone number field entries press field number To assign zone descriptors press 93 follow menu prompts To add custom words press 93 follow menu prompts To enter Installer Message press 93 follow menu prompts To exit programme mode press 99 OR 98 99 allows re access to programming mode by installer code prevents re access to programming mode by installer code 4 FIELD CATEGORIES Group Group Group the following pages the programming fields have been arranged by category Use this index to cross reference numerical ordered fields on the programming form Menu Mode Menu Mode Menu Mode Menu Mode Menu Mode Menu Mode Menu Mode Menu Mode Menu Mode