DSC ESCORT4580 v1 2 - Installation Manual - English - MAXSYS Telephone Interface & Automation Control Module

File Preview
Click below to download for free
Click below to download for free
File Data
| Name | dsc-escort4580-v1-2-installation-manual-english-maxsys-telephone-interface-automation-control-module-8052743691.pdf |
|---|---|
| Type | |
| Size | 915.02 KB |
| Downloads |
Text Preview
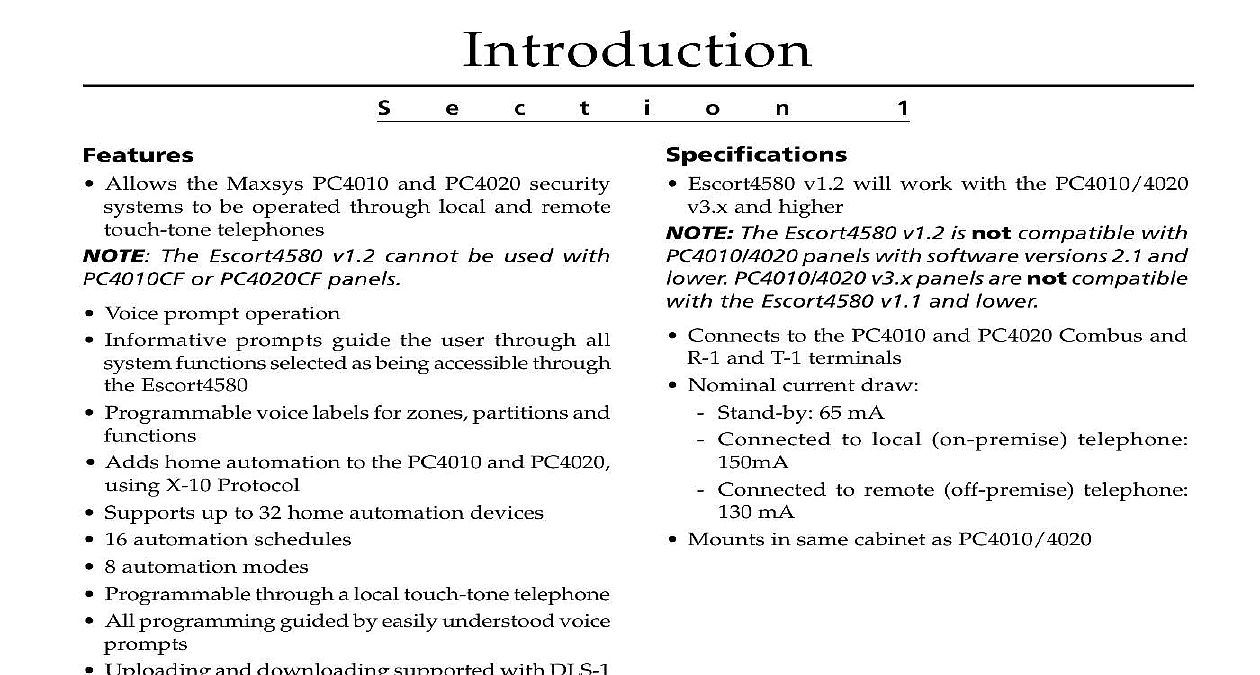
Introduction Escort4580 v1.2 will work with the PC4010 4020 and higher The Escort4580 v1.2 is not compatible with panels with software versions 2.1 and PC4010 4020 v3 x panels are not compatible the Escort4580 v1.1 and lower Connects to the PC4010 and PC4020 Combus and and T 1 terminals Nominal current draw Stand by 65 mA Connected to local on premise telephone Connected to remote off premise telephone mA Mounts in same cabinet as PC4010 4020 Allows the Maxsys PC4010 and PC4020 security to be operated through local and remote telephones The Escort4580 v1.2 cannot be used with or PC4020CF panels Voice prompt operation Informative prompts guide the user through all functions selected as being accessible through Escort4580 Programmable voice labels for zones partitions and Adds home automation to the PC4010 and PC4020 X 10 Protocol Supports up to 32 home automation devices 16 automation schedules 8 automation modes Programmable through a local touch tone telephone All programming guided by easily understood voice Uploading and downloading supported with DLS 1 and DLS 2 v1.3 Windows downloading packages RJ11X Connector to X10 Module an RJ11X connector and cable not supplied connect the Escort4580 to an X 10 PL 513 or X Pro PSC04 module Refer to and follow the instructions for installing the PL or PSC04 module following diagram shows the required cable connecting the Escort4580 to the PSC04 PL513 the jacks side by side tabs facing up the of the wire in each jack will appear in the order from left to right This cable is called a Through Cable as per telephone standards Please do not use a cable as it will not work with the To verify whether you have the type of cable plug in the PSC04 PL513 The LED should turn ON Connect the telephone to both the PSC04 PL513 and the If the LED on the PSC04 PL513 turns and remains unlit you are using the wrong type cable the Cabinet the Escort4580 on either side wall of the cabinet mounted in a dry secure If mounting a new cabinet for the Escort4580 a dry location close to the already installed alarm panel and close to the telephone connection mount the unit Press the four plastic stand offs through the holes on the side wall of the cabinet Hold the cabinet in position and pull all wires into cabinet Secure the cabinet to the wall in the desired location appropriate wall anchors when securing the to drywall plaster concrete brick or other Press the circuit board into the plastic stand offs secure the module to the cabinet the unit is mounted complete the wiring beginning to wire the unit ensure that all AC transformer and battery is disconnected the control panel Refer to the wiring diagram page ii wire the Escort4580 Connect the four Combus wires to the Escort4580 the red black yellow and green Combus to the RED BLK YEL and GRN terminals RNG and TIP Terminals the Escort4580 RNG terminal to the alarm panel R 1 terminal the Escort4580 TIP terminal to the alarm panel T 1 terminal the Escort4580 T 1 terminal to the brown conductor of the premises telephone line the Escort4580 R 1 terminal to the grey conductor of the premises telephone line The Escort4580 must be located after the panel on the telephone lines The will not function if connected at any point on the telephone lines the system disarmed perform the following to the Escort4580 Programming Mode Pick up a local telephone handset You will hear Enter the Telephone Access code The default Access code is You can reprogram code in Section 020 The system prompts with the prompt number Tone Enter programming mode by pressing 8 The prompts the Service Code Enter the 4 digit Service code The default service is 4580 You can change the service code in section 001 After the service code entered the system prompts a Section Number To exit To enter a programming section enter the 3 digit of the section If you make an error the section number the system prompts entry Enter a Section To exit press you enter a section number the system the section you have entered with the number Data Entry Sections program a data entry section from the Escort4580 mode Enter the 3 digit section number The system announces the section you have system announces the data presently in the programming section as is data system then prompts new data Enter the new data in the section or return to the a Section Number prompt by pressing you have finished entering the new data system announces the new data with the is data you make an invalid data entry the system Entry Data is data new data Record the new data in the appropriate section of Programming Worksheets Toggle Option Sections program a section with toggle options from the programming mode Enter the 3 digit section number The system announces the section you have with the prompt number system announces which options are presently ON with one of the following prompts options are off options are on number is on numbers are on system then prompts two digit option To Exit pound To exit the section without making any changes turn an option ON or OFF enter the 2 digit number you enter an invalid option number the system entry you enter a valid option number the system announces which options are ON When you have finished programming the options the section press The system returns to the a Section Number prompt Record your new programming choices in the section of the Programming Label Entry Sections program or change a label Enter the section number of the label The system the section number and then recites the presently programmed in the label Each may have up to six words system then prompts three digit word To exit pound Enter the first word of the label using the 3 digit from the Label Library in Appendix B of the Worksheets system beeps at the end of each correctly code and the system prompts three digit word To exit pound you make an invalid entry the system prompts entry Enter three digit To exit press pound you have more words to program enter the 3 code of each word until you are finished When you have entered six words the system will the label If your label is less than six words To have the system read the new label to you enter programming section for the label again the label is correct press To change the label repeat steps 1 5 above Record the new label in the appropriate section of Programming Worksheets section 9 Label Programming for more on how to program labels you have completed all programming hang up handset Programming Service Code Service code allows access to the Escort4580 sections Enter a 4 digit code in this The default Service code is


