DSC PC4010 v2 1 - Programming Worksheet - English - MAXSYS 8-64 Zone Control Panel

File Preview
Click below to download for free
Click below to download for free
File Data
| Name | dsc-pc4010-v2-1-programming-worksheet-english-maxsys-8-64-zone-control-panel-5230871469.pdf |
|---|---|
| Type | |
| Size | 974.64 KB |
| Downloads |
Text Preview
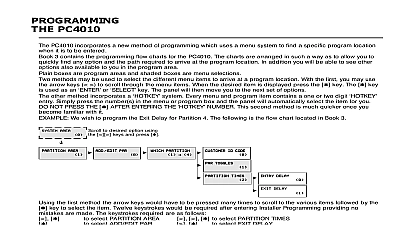
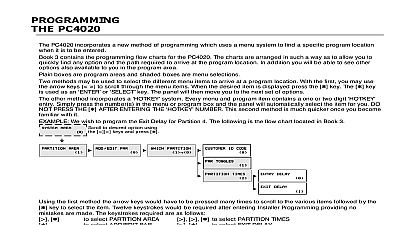
PROGRAMMING PC4010 PC4010 incorporates a new method of programming which uses a menu system to find a specific program location it is to be entered 3 contains the programming flow charts for the PC4010 The charts are arranged in such a way as to allow you to find any option and the path required to arrive at the program location In addition you will be able to see other also available to you in the program area boxes are program areas and shaded boxes are menu selections methods may be used to select the different menu items to arrive at a program location With the first you may use arrow keys to scroll through the menu items When the desired item is displayed press the Q key The Q key used as an or key The panel will then move you to the next set of options other method incorporates a system Every menu and program item contains a one or two digit Simply press the number s in the menu or program box and the panel will automatically select the item for you NOT PRESS THE Q AFTER ENTERING THE NUMBER This second method is much quicker once you familiar with it We wish to program the Exit Delay for Partition 4 The following is the flow chart located in Book 3 AREA AREA AREA AREA AREA to desired option using keys and press Q AREA AREA AREA AREA AREA ADADADADADD D D D D EDIT PAR PAR PAR PAR PAR WHICH PARTITION PARTITION cid 254 CUSTOMER ID CODE PARTITION PARTITION ID CODE ID CODE ID CODE ID CODE PARTITION PAR TOGGLES TOGGLES TOGGLES TOGGLES TOGGLES PARTITION TIMES TIMES TIMES TIMES TIMES ENTRY DELAY DELAY DELAY DELAY DELAY EXIT DELAY DELAY DELAY DELAY DELAY select EXIT DELAY to select PARTITION TIMES to select EXIT DELAY Q to select PARTITION TIMES Q the first method the arrow keys would have to be pressed many times to scroll to the various items followed by the key to select the item Twelve keystrokes would be required after entering Installer Programming providing no are made The keystrokes required are as follows Q select PARTITION AREA select ADD EDIT PAR Q to select to PARTITION 4 the second method we require only 5 keystrokes to select PARTITION AREA to select ADD EDIT PAR to select PARTITION 4 less keystrokes required programming is quicker as there is less chance of an error occurring any time you may press the key to exit a section ANY DATA ENTERED WILL BE CHANGED THE KEY IS NOT ABORT KEY The key can also be pressed to move you back to the previous menu Pressing the key several will exit you from Installer Programming make programming easier the INDEX at the back of the Programming Manual includes the chart number beside every as well as the page number for a description of the option Toggle Options program areas contain several toggle options which pertain to the menu item selected Use the arrow keys to through the various items Press the Q key to toggle between Y es and N o for each feature Once all the toggle have been programmed press the key to save your changes return to the previous menu HEX Digits HEX digits are required for a program item When a HEX digit is required press the Q key to enter the HEX menu may use the arrow keys to scroll through the HEX digits A through F and when the desired letter is displayed press Q key much quicker method for entering HEX digits is to first press the Q key followed by the number corresponding the HEX letter i e A 1 B 2 C 3 up to F 6 The Q key must be pressed before entering each HEX digit as the returns you to decimal programming automatically after each entry To enter data on a PC4010 you would enter 1 Q 2 Q 3 Q 4 The Q key is required before every HEX digit entered Digit Code 0 1 0 Digit Code 0 1 0 0 0 Digit Code 2 3 4 Digit Code 2 3 4 5 6 Digit Code A A A Digit Code A A A 0 0 Digit Code A A A 0 0 SHEETS Options Installer Code 0 cid 254 00 cid 254 0 Grand Master Code 0 cid 254 00 cid 254 1 2nd Grand Master Code 0 cid 254 00 cid 254 2 Walk Test Code 0 cid 254 00 cid 254 3 Digit Code Installer Lockout Enabled 0 cid 254 00 cid 254 4 A A A No Messages to Arm Event Message 0 cid 254 01 cid 254 0 y a s e m d a When Armed Event Message 0 cid 254 01 cid 254 1 r m o l r m u r e d c h Detector Event Message 0 cid 254 01 cid 254 2 r m e d i m e l e m o k e W i Zone Event Message 0 cid 254 01 cid 254 3 i m e l r w e n s o r a Reset Message 0 cid 254 01 cid 254 4 e n s o Output Message 0 cid 254 01 cid 254 5 t e s e u u Tamper Event Message 0 cid 254 01 cid 254 6 a m p e r o n e Fault Event Message 0 cid 254 01 cid 254 7 o n e a u following messages will be displayed only when the Double EOL option is enabled Options Toggle Options 0 cid 254 cid 254 cid 254 cid 254 cid 254 02 cid 254 cid 254 cid 254 cid 254 cid 254 0 Sys Mas Up Shunt Tbl Disp Hz Line future use Inhibit Arm Inhibit Arm Disp Disp Digit Codes Print