DSC PG9912-8912-4912 Installation Manual ENG FRE SPA POR - 29008703R001

File Preview
Click below to download for free
Click below to download for free
File Data
| Name | dsc-pg9912-8912-4912-installation-manual-eng-fre-spa-por-29008703r001-7296413058.pdf |
|---|---|
| Type | |
| Size | 1.64 MB |
| Downloads |
Text Preview
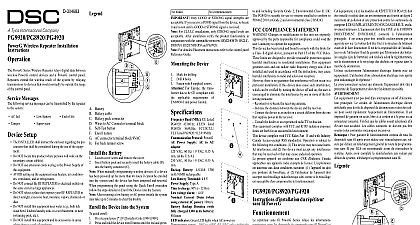
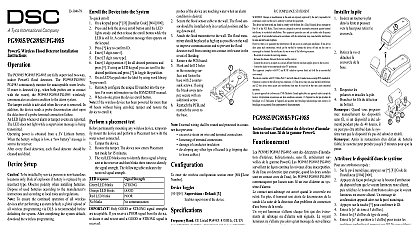
D 304676 Rooms where white noise such as air compressor noise present a blast of compressed air may cause a false or lined drapes are used If the sensor is mounted on same wall point the tester at the opposite wall When the LED on the sensor goes solid momentarily while PowerG 2 way Glass break PGx912 is a supervised wireless 2 way glass break detec that detects the breaking of framed glass mounted in a wall PGx912 is protected by a front and back tamper switch that a tamper message when the cover is removed or when base is forcibly detached from the wall A red LED on the transmitter PCB visible only when the cover is lights whenever alarm or tamper events are reported The does not light while a supervision message is being trans Setup To be installed by service persons in non hazardous only Risk of explosion if battery is replaced by an type Dispose of used batteries according to the manu instructions and according to local rules and regula Batteries are to be replaced by service persons only polarity when replacing batteries The PGx912 has a back tamper switch under the As long as the PCB is seated firmly within the base the lever will be pressed against a special break away base that is loosely connected to the base Be sure to fasten break away segment to the wall If the detector unit is forci removed from the wall this segment will break away from base causing the tamper switch to open The back tamper switch will not protect the unit the break away base segment is secured to the wall with least one screw To ensure the continued operation of all wireless devices performing a system default a global upload of all wire programming via DLS is recommended before defaulting system After completing the system default download the programming Microphone Detection indicator Acoustic sensor module PowerG transmitter module Battery Tamper switch Transmit Indicator Enroll button Mounting holes Detection indicator Break away base segment Max range of 6m 20ft Sensor acoustic sensor module of the PGx912 provides 360 cov Coverage is measured from the sensor to the point on the farthest from the sensor The sensor can be mounted as as 1 m 3.3 ft from the glass mounted on opposite wall or adjoining walls the range is m 20 ft for plate tempered laminated and wired glass mounted on the ceiling the maximum range is 6 m 20 for plate tempered laminated and wired glass For armor glass mount the sensor no more than 3.65 m 12 ft from glass the battery Use a screwdriver to separate the cover from the base While observing polarity insert the battery into the battery Click the front tamper switch once and release it to reset transmitter at power up When manually programming wireless devices if a has been powered up for more than 48 hours it cannot be into the system until the device has been tampered and When programming the panel using the Quick Enroll follow the steps detailed in Enroll the Device into the After restoring a low battery trouble the system may take to 5 minutes to clear the trouble the Device into the System quick enroll On a keypad press 8 Installer Code 804 000 and hold the device enroll button until the LED lights and then release the enroll button while the LED is lit A confirmation message then appears on the key key to confirm ID Enter 3 digit zone Enter 3 digit zone type Enter 1 digit partition for all desired partitions and If using an LCD keypad you can scroll to the partitions and press to toggle the partition On an LCD keypad enter the label by using word library pre enroll Remotely configure the unique ID number into the system more information see the HSM2HOST manual When on site press the device enroll button If the wireless device has been powered for more then 48 without being enrolled tamper and restore the device to it Testing permanently mounting any wireless device temporarily the device and perform a Placement test Tamper the device by removing the cover Restore and re tamper the device Verify the red LED blinks indicating detection After 2 the LED blinks 3 times The following table indi received signal strength Strength communication response LED blinks LED blinks LED blinks blinks Only GOOD or STRONG signal strengths are If you receive a POOR signal from the device re it and re test until a GOOD or STRONG signal is For UL ULC installations only STRONG signal levels acceptable After installation verify the product functional in conjunction with the compatible receivers HSM2HOST9 HS2ICNRF P 9 and PG9920 For detailed Placement instructions refer to the control Reference Guide the Device reliable detection avoid installing in Rooms with lined insulating or sound deadening Rooms with closed wooden window shutters Avoid rooms smaller than 3 x 3 m 10 x 10 ft Glass airlocks and glass vestibule areas Noisy kitchens Parking garages Small utility rooms Stairwells Small bathrooms Very humid rooms the PGx912 is not hermetically Excess moisture may cause the circuit board to and trigger false alarms Other small acoustically live rooms where the dimen of the protected glass are smaller than the dimen listed in the Specifications When requiring 24 hour glass break detection it is rec to configure as either an interior or exterior and to use shock sensors on the windows or win frames Install the sensor at least 1.2 m 4 ft away from noise televisions speakers sinks doors etc Locate the sensor in a direct line of sight of all protected Glass break sensors should always be backed up by inte protection Ceiling and adjoining side walls are good sensor loca Position a ceiling mounted sensor 2 3 m 6 10 away from the protected glass mount the device Remove the PCB from the base Using the screws and plugs provided securely fasten the to the mounting surface enter the wireless configuration section enter 804 Zone Toggles Supervision Default Y supervision of the device Mode PGx912 detects the breakage of framed glass mounted in outside wall Testing the sensor with unframed glass broken etc may not trip the sensor The sensor typically does trip if a glass breaks in the middle of the room it is that a burglar will break glass in the middle of a room such are considered false alarms Pattern Recognition Technology of the PGx912 ignores false alarm sounds including glass break testers In order test the PGx912 a test mode is used With the sensor in the mode processing of the glass break pattern in the upper lower frequencies is disabled The PGx912 is then sensitive to the mid range frequencies which the Sentrol 5709C tester reproduces It the mid range frequencies that sensor coverage the normal mode the detection LED flashes briefly upon a loud sound when in the normal mode the PGx912 not trip to the tester signal unless the tester is held next the sensor Each time the sensor triggers an alarm it also enters the mode for one minute the Sensor to the Test Mode the Sentrol 5709C or the Intellisense FG701 hand held tes to switch the sensor into the test mode Set the tester to tem glass hold the tester speaker directly on top of the sensor activate the tester The sensor will alarm then it will go into mode for one minute When in test mode the LED on the will flash continuously Prolong the test session by firing tester at the sensor at least once a minute the Sensor tester has a different setting for each type of glass It should be set for tempered or laminated glass either is correct both have the same range unless you are certain that all the glass is plate glass Holding the tester near the surface of the glass aim the tes at the PGx912 and press the test button If drapes or are present test with the hand held tester behind the drapes or blinds do not install the sensor where tester is triggered the glass is within detection range the LED does not go solid but continues flashing as