DSC SG PSA SOFTWARE v1 0 IM EN NA R000

File Preview
Click below to download for free
Click below to download for free
File Data
| Name | dsc-sg-psa-software-v1-0-im-en-na-r000-4895103726.pdf |
|---|---|
| Type | |
| Size | 1.27 MB |
| Downloads |
Text Preview
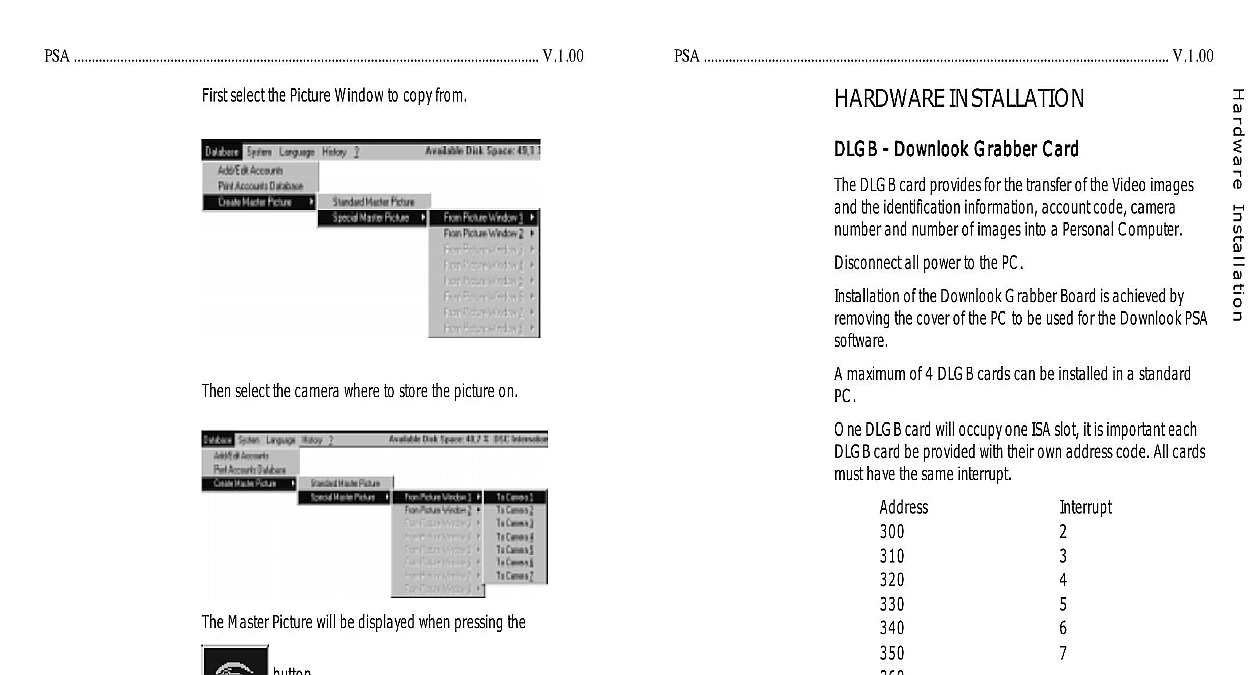
PSA V 1.00 V 1.00 select the Picture Window to copy from INSTALLATION Downlook Grabber Card Downlook Grabber Card Downlook Grabber Card Downlook Grabber Card Downlook Grabber Card DLGB card provides for the transfer of the Video images the identification information account code camera and number of images into a Personal Computer all power to the PC of the Downlook Grabber Board is achieved by the cover of the PC to be used for the Downlook PSA maximum of 4 DLGB cards can be installed in a standard DLGB card will occupy one ISA slot it is important each card be provided with their own address code All cards have the same interrupt DLGB will be factory set to address 340 interrupt 5 setting the address and interrupt insert the DLGB card into own slot position the card with the holding screw on the bracket Repeat this procedure for all cards the PC cover and connect all PC cables connection of the DLGB card to the DML5A back plane use 9 pin and 25 pin straight through cables Refer to installation guide for further information the address and interrupt settings the settings will be into the Downlook PSA Software select the camera where to store the picture on Master Picture will be displayed when pressing the button V 1.00 V 1.00 reduct possible conflicts It is the PSA is used only DOS and Windows or Windows 95 Interface Interface Interface Interface Interface Downlook Interface card is needed to receive the events and from the Sur Gard MLRVA Downlook Video receiver to PSA software Downlook Interface is a PC card that can be installed in an slot of a standard PC maximum of 4 interface cards be installed per PC page 1 how to set the address and interrupt of each interface card the Camera Info frame you can enter the names positions the camera s installed at the location where the pictures are from The name of the camera will be displayed on the left corner of each Picture Window and on the reports checkbox entry is for future use the database is changed first click add edit accounts changes are not made in the database before Accounts Database Accounts Database Accounts Database Accounts Database Accounts Database the menu Print Accounts Database is selected a report of accounts is printed Only the information of tab frame 1 is Master Picture Master Picture Master Picture Master Picture Master Picture Master Picture is a stored picture used as a reference All new events of that camera can be compared with the stored Master Picture The PSA can store up to 7 Pictures per account There is one Master Picture for each installed Downlook Camera to create a Standard Master Picture to create a Standard Master Picture to create a Standard Master Picture to create a Standard Master Picture to create a Standard Master Picture an event first from the Received Event window Event on window or History window picture s are displayed in the Picture Windows select the menu Create Master Picture The picture of Window 1 is copied to the master picture database at 2 to create a to create a Master Picture Master Picture to create a Special Master Picture Master Picture to create a to create a Master Picture a Special Master Picture you can create a picture from a Picture Window to the master picture database at a Camera position cables are connected from the Downlook Interface card to DML5A backplane 25 pin cable for the pictures and a 9 pin cable for the serial cables can have a maximum length of 30 meters 100 cables are not supplied with the Downlook Interface V 1.00 V 1.00 the account is not available in the database then the following will be displayed INSTALLATION If this is a new enter the code then click you want to add this account press New otherwise press Account Info Form has 4 tab frames Account Info Camera Info Downlook Codes for future use Modem Fax numbers for future use Info Info Info Info Info PSAV1.00 software only be installed operated on where no programs are except for 3.1 or 95 and DOS to 6 xx Procedure Procedure Procedure Procedure Procedure Turn on the PC and start up Windows Go to Program Manager screen Go to menu item File or Start Windows 95 and select Run The following window will be displayed PSA V1.00 Disk 1 in drive A Windows 95 will display this window slightly Windows 95 will display this window slightly Windows 95 will display this window slightly Windows 95 will display this window slightly Windows 95 will display this window slightly Hardware Hardware Hardware Hardware Hardware 486 66 DX2 8 MB RAM 470 MB hard drive SVGA Color x 600 colors Mouse Downlook Interface 3.5 disk drive Hardware Hardware Hardware Hardware Hardware 586 60 and up 16 MB RAM and up 1.2 GB hard drive SVGA Color x 600 colors Mouse Downlook Interface 3.5 disk drive At the command cursor type the following A Click OK button If there are other active applicatations the If there are other active applicatations the If there are other active applicatations the If there are other active applicatations the If there are other active applicatations the window will be displayed window will be displayed window will be displayed window will be displayed window will be displayed these applications and start the setup again V 1.00 V 1.00 The PSA V1 xx Setup program will now be displayed on the DATABASE Add Edit Accounts Add Edit Accounts Add Edit Accounts Add Edit Accounts Add Edit Accounts the menu Add Edit Accounts is selected the following is displayed Remove Disk 1 and insert Disk 2 OK following window will be displayed all active applications OK following window will be displayed account number must be entered first Example 01234 the entered account is available in the database the will be displayed PSA program will be installed on drive c V 1.00 V 1.00 the button to continue the installation of Disk 3 the following window will be Disk 2 and insert Disk 3 OK 3 will now be installed from A drive to C


