DSC WLS907-433 - Installation Manual - English - French - Spanish - Wireless DoorWindow Contact

File Preview
Click below to download for free
Click below to download for free
File Data
| Name | dsc-wls907-433-installation-manual-english-french-spanish-wireless-doorwindow-contact-0126847395.pdf |
|---|---|
| Type | |
| Size | 882.15 KB |
| Downloads |
Text Preview
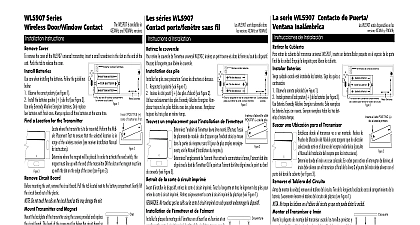
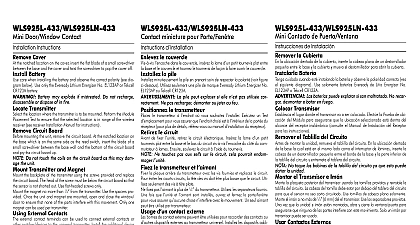
The WLS907 is available in 433MHz and 900MHz versions Series Door Window Contact Installation Instructions Cover remove the cover of the WLS907 universal trans insert a small screwdriver in the slot on the of the unit Push the tab to release the cover Batteries care when installing the batteries Follow the below Observe the correct polarity see Figure 1 Install the batteries positive side first see 2 only Eveready Alkaline Energizer batteries Only replace low batteries with ones Always replace all three batteries at the same time a Location for the Transmitter 1 where the transmitter is to be mounted the Module Placement Test to ensure that selected location is in range of the wireless see receiver Installation Manual for where the magnet will be placed In order to activate the reed switch the must line up with the end of the transmitter OR the dot on the magnet must up with the dot on the edge of the cover see Figure 3 2 3 Circuit Board mounting the unit remove the circuit board Pull the tab located next to the battery compartment Gently lift circuit board out of the plastic Do not touch the coils on the circuit board as this may damage the unit Transmitter and Magnet the backplate of the transmitter using the screws provided and the circuit board The head of the screw must be below the circuit so that the sensor is not shorted out Use flat headed screws only wall anchors if necessary the cover carefully so as not to damage the antenna the magnet no more than from the transmitter Use the spacers see Figure 4 Once the unit and magnet are mounted open and the window door to ensure that none of the parts interfere with this Only one magnet can be used per transmitter will block reflect a wireless signal DO NOT mount the WLS907 or any other wireless component on or near metal objects e g metal doors metal window blinds Instead find a nearby location that provides test and use the external contacts instead of the built in reed switch Try to avoid mounting the wireless receiver in basement or near large metal surfaces e g metal ductwork as this can reduce the range External Contacts external contact terminals can be used to connect external contacts or other switches devices to the universal Install the additional device as per the manufacturer instructions Connect the device to the contact ter of the WLS907 The input is normally closed and is not supervised wires connecting the external device to the input terminals can be any length provided that the resistance of the does not exceed 100 one contact can be used If an external contact is used do not install the magnet Switch is a tamper switch on the WLS907 board Removing the cover of the WLS907 will cause a zone tamper See panel Installation Manual for more information on trouble conditions 4 WLS907 sont disponsible dans versions 433MHz et 900MHZ s WLS907 porte fen sans fil Instructions d le couvercle retirer le couvercle de l universel WLS907 ins un tourne vis dans la fente au bout du dispositif Poussez la pour lib le couvercle des pile les piles avec pr Suivez les directives ci dessous Respectez la polarit voir Figure 1 Ins le c positif des piles d voir Figure 2 exclusivement des piles Eveready Alkaline Energizer Remplacez toujours les piles avec des piles neuves Remplacez toujours les trois piles en m temps un emplacement pour l l 1 l o l devra mont Effectuez de placement de module afin d que l se trouve dans la port du r sans fil pour de amples renseignements voir le Manuel d du r l de l Pour activer le commutateur lames l doit avec le bout de l OU le point sur l doit align avec le point au bord couvercle voir Figure 3 2 3 de la carte circuit imprim d le dispositif retirez la carte circuit imprim Tirez la languette et tirez le logement des piles pour retirer la carte circuit imprim Retirez soigneusement la carte circuit imprim du plastique voir Figure 1 Ne touchez pas les selfs sur la carte circuit imprim car cela pourrait endommager le dispositif de l et de l la plaque de montage de l en utilisant les vis fournies et en rempla la carte circuit imprim La t de vis doit se trouver sous la carte circuit imprim de sorte que le capteur ne soit pas court circuit N que des vis t Utilisez des ancres si n Replacez le couvercle soigneusement de mani ne pas endommager l l moins de 0,5 cm de l Utilisez les s fournis voir Figure 4 Une fois que le dispositif et l sont install et fermez la fen ou la porte afin de vous assurer que rien ne g ce Un seul aimant peut utilis par Le m bloque ou un signal sans fil N PAS le WLS907 ou tout autre dispositif fil sur ou c d m importants par ex portes en m m Trouvez un endroit proche qui donne de bons r utilisez le contact ext au lieu du commutateur lame int le r sans fil dans un sous sol ou pr d surface m par ex gaine m car cela pourrait sa port de contacts externes bornes de contact externe peuvent utilis pour connecter des contacts externes ou autres commutateurs dispositifs l universel Installez le dispositif suppl conform aux instructions du fabricant Branchez le dis aux bornes de contact du WLS907 L est normalement ferm et elle n pas surveill fils de branchement du dispositif externe aux bornes d peuvent d longueur quelconque condition que r des fils ne d pas 100 Un seul contact peut utilis Si un contact ext est utilis n l anti sabotage carte du WLS907 poss interrupteur anti sabotage Le retrait du couvercle du WLS907 provoquera un sabotage de zone de plus amples renseignements sur les probl consultez le Manuel d de votre panneau 4 Please refer to the system Installation Manual for information on limitations product use and function and information on the limitations as to liability of the Veuillez vous r au Manuel d du Syst pour des informations les limites concernant l et le fonctionnement du produit et des informations sur les concernant la responsabilit du fabricant WLS907 est disponsibles en las 433MHz y 900MHz serie WLS907 Contacto de Puerta Ventana Instrucciones de Instalaci la Cubierta retirar la cubierta del transmisor universal WLS907 un destornillador peque en el espacio de la parte final la unidad Empuje la leng para liberar la cubierta Bater cuidado cuando est instalando las bater Siga las a continuaci Observe la correcta polaridad ver Figura 1 Instale primero el lado positivo de las bater ver Figura 2 bater Eveready Alkaline Energizer solamente Solo reemplace las bater bajas nuevas Siempre reemplace todas las tres bater al mismo tiempo una Ubicaci para el Transmisor donde el transmisor va a ser montado Realice la Prueba de Ubicaci del para asegurar que la ubicaci seleccionada est