DSC WS4904 Installation Instructions (English, Dutch, Swedish)

File Preview
Click below to download for free
Click below to download for free
File Data
| Name | dsc-ws4904-installation-instructions-english-dutch-swedish-2819635047.pdf |
|---|---|
| Type | |
| Size | 1021.80 KB |
| Downloads |
Text Preview
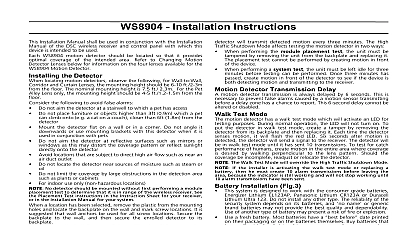
WS4904 Installation Instructions Installatiehandleiding installationshandbok Mount the detector flat on a wall or in a corner Do not angle it downwards or use mounting brackets with this detector afstand van 6ft 1,8m tot de melder Do not aim the detector at reflective surfaces such as mirrors or windows as this may distort the coverage pattern or toegepast in aanwezigheid van huisdieren montagebeugels 6ft 1.8m from the detector it is used in conjunction with pets sunlight directly onto the detector Installation Manual shall be used in conjunction with the Installation Manual of the DSC wireless receiver and con panel with which this device is intended to be used WS4904 motion detector should be located so that it provides optimal coverage of the intended area Refer to Motion Detector Lenses below for information on the four lenses available for the WS4904 Motion Detector the Detector locating motion detectors observe the following for Wall to Wall Corridor and Curtain Lenses the mounting should be 6 10 ft 2 3m from the floor The nominal mounting height is 7.5 ft 2.3m For the Pet Alley Lens only mounting height should be 4 5 ft 1.2 1.5m from the floor the following to avoid false alarms Do not aim the detector at a stairwell to which a pet has access Do not place furniture or objects higher than 3ft 0.9m which a pet can climb onto e g a cat on a couch closer Avoid locations that are subject to direct high air flow such as near an air duct outlet Do not locate the detector near sources of moisture such as steam or oil Do not limit the coverage by large obstructions in the detection area such as plants or cabinets For indoor use only non hazardous locations No detector should be mounted without first performing a module placement test to determine that it is range of the wireless receiver See the Placement Test instructions in the Instruction Sheet for your receiver in the Installation Manual for your system a location has been selected remove the plastic from the mounting holes and locate the backplate on the wall and screw locations It is suggested that wall anchors be used for all screw locations Secure the backplate to the wall then secure the enrolled detector to its backplate Use only backplates marked as Using any other backplates will result in the tamper switch broken a WS4904 the back of the PIR housing there will be a six digit number Motion Detector Lenses motion detector is supplied with the Wall to Wall lens three additional lenses are available for the WS4904 motion The charts on the following page illustrate the range and coverage patterns of each lens change the lens first open the motion detector by removing the screw in the bottom of the battery compartment With screw removed pull the back of the detector away from the front case Remove the lens holder by pressing down on top of the holder and pulling the holder away from the case When installing the new lens ensure the grooved surface the interior of the case and the notches on the lens face the bottom of the case Replace the lens holder by snap it back into place Reassemble the motion detector by first engaging the clips on the bottom of the case Close the and then secure the case with the screw in the bottom of the battery compartment the Motion Detector Sensitivity motion detector features Fast and Slow detection modes which are set on jumper JP1 In a normal operating envi the fast setting provides the best detection certain environments where rapid air movement heaters and other variables present problems use Slow detection to stabilize the detection Jumper is located at the top right under the battery bucket of the circuit board To the setting from Fast to Slow move the jumper over one pin as shown in Figure 4 Traffic Shutdown Mode prolong battery life the motion detector uses a feature called High Traffic Shutdown When motion is detected the will transmit to the receiver and will then shut down for three minutes If motion is detected again during the shut time the unit will not transmit the event to the receiver The detector will thus remain in the shutdown mode until minutes after the first motion detected was transmitted The detector will transmit detected motion every three High Traffic Shutdown Mode affects testing the motion detector in two ways When performing the module placement test the unit must be tampered by removing it from the backplate and repla it The placement test cannot be performed by creating motion in front of the device When performing a system test the unit must be left idle for three minutes before testing can be performed Once minutes has passed create motion in front of the detector to see if the device is both detecting motion and to the receiver Detector Transmission Delay motion detector transmission is always delayed by six seconds This is necessary to prevent false alarms caused by a sensor transmitting before a delay zone has a chance to report This six second delay cannot be altered or disa Test Mode motion detector has a walk test mode which will activate an LED for testing purposes During normal operation the will not turn on To put the detector in walk test mode create a tamper by removing the detector from its backplate then replacing it Each time the detector senses motion it will flash the red LED Six seconds after motion is detec the detector will send a signal to the receiver The detector will be in walk test mode until it has sent 10 transmis To test for catch performance of humans create motion in the entire area where coverage is desired by walking to the lens pattern Should the coverage be incomplete readjust or relocate the detector The Walk Test Mode will override the High Traffic Shutdown Mode If the installer is activating the walk test mode or replacing a battery then he must create 10 alarm trans before leaving the area because the indicator is still working and will not stop working until 10 alarm have been sent Installation Fig 3 This system is designed to work with the following consumer grade batteries Energizer Lithium EL123AP Panasonic CR123A or Duracell Lithium Ultra 123 Do not install any other type The reliability of the security system on its batteries and name or generic brand batteries may not provide the best quality and dependabi Use of another type of battery may present a risk of fire or explosion Use a fresh battery Most batteries have a before date printed on their packaging or on the batteries themselves batteries that have a before date of two years or more from your purchase date the motion detector from its mounting plate by holding the sensor by its sides and pushing up Remove the bat cover see Figure 3 Remove the old battery and install new battery Place the battery cover back on Secure the battery cover with the small screw provided the sensor on its mounting plate making sure it snaps into place After the battery is installed the detector will 60 seconds to warm up During this time the LED will flash slowly The polarity of the battery must be observed Figure3 Improper handling of lithium batteries may in heat generation explosion or fire which may lead to personal injuries DANGER OF EXPLOSION IF BATTERIES ARE INSTALLED INCORRECTLY REPLACE ONLY WITH THE SAME EQUIVALENT TYPE RECOMMENDED BY THE MANUFACTURER away from small children If batteries are swallowed promptly see a doctor Do not try to recharge these Disposal of used batteries must be made in accordance with the waste recovery and recycling regu in your area The battery may explode if mistreated Do not dispose of in fire recharge or disassemble Operating Temperature 10 to 55 14 to 131 Operating Humidity 5 to 93 RH non cond Battery Life 9 years typical usage in room temperature Battery Nominal Voltage is 3V Low Battery Trouble indication is provided at 2.2V Compatible with RF5132 433 RF4164 433 RFK55XX 433 RF5108 433 SCW9045 47 433 PC9155 433 instructies dienen te worden gebruikt in combinatie met de installatiehandleiding van de DSC draadloze ontvanger en cen waarmee deze apparatuur gebruikt gaat worden WS4904 bewegingsmelder dient zo te worden geplaatst dat deze het beoogde gebied optimaal dekt Raadpleeg van de lenzen van de bewegingsmelder hieronder voor informatie over de vier lenzen die beschikbaar zijn voor de bewegingsmelder van de melder bij het plaatsen van de bewegingsmelders op het volgende voor muur tot muur gang en gordijnlenzen dient de montagehoogte ft 2 3m van de vloer te bedragen De nominale montagehoogte is 7,5 ft 2,3 m Voor de Pet Alley lens huisdierenlens dient montagehoogte 4 5 ft 1,2 1,5m vanaf grondniveau te bedragen