Edwards E-2WIRE Analog Class A-B Two-Wire Module Installation Sheet

File Preview
Click below to download for free
Click below to download for free
File Data
| Name | edwards-e-2wire-analog-class-a-b-two-wire-module-installation-sheet-1203594867.pdf |
|---|---|
| Type | |
| Size | 722.43 KB |
| Downloads |
Text Preview
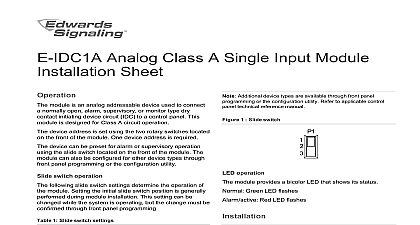
Analog Class A B Two Wire Module Sheet E 2WIRE module is designed to interface between two wire smoke detectors and a control panel It the circuit and smoke detectors and signals the panel of any trouble or alarm conditions The module regulates and supervises the 24 VDC input power module is configured from the factory to operate as a two alarm device that does not require alarm verification It be configured for two wire alarm verified operation through panel programming or the configuration utility When the alarm verification feature of the control panel do not normally open contact initiating devices with two wire smoke detectors module recognizes the CleanMe signal from detectors that this feature module device address is set using the two rotary located on the front of the module One device is required device can be set for Class B or Class A operation using slide switch located on the front of the module This module cannot be used on a device loop with modules or isolator bases switch operation following slide switch settings determine the operation of module Setting the initial slide switch position is generally during module installation This setting can be while the system is operating but the change must be through front panel programming 1 Slide switch operation Operation Device type description B B 2 wire smoke non verified the module to monitor two wire smoke detectors that do not alarm verification and normally contact initiating devices on a Class B A 2 wire smoke non verified the module to monitor two wire smoke detectors that do not alarm verification and normally contact initiating devices on a Class A used A Additional device types are available through front panel or the configuration utility Refer to applicable panel technical reference manual 1 Slide switch operation module provides a bicolor LED that shows its status Green LED flashes Red LED flashes This module will not operate without electrical As fires frequently cause power interruption you should further safeguards with your local fire protection The module is shipped from the factory as an assembled it contains no user serviceable parts and should not be install the module Verify that all field wiring is free of opens shorts and faults Make all wiring connections as shown in Set the module address as follows a screwdriver to adjust the two rotary switches on the of the module Set the TENS rotary switch 0 through for the 10s and 100s digit and the ONES rotary switch the 0 through 9 digit For example device address 21 TENS rotary switch to 2 and set the ONES rotary to 1 to for available address numbers Set slide switch P1 to appropriate setting Refer to 2013 UTC Fire Security All rights reserved 4 3101192 REV 03 REB 25JAN13 Mount the module on the electrical box using screws 3 Module installation with the electrical box Mount the wall plate on the module using 4 24 1 2 in mm self tapping screws 2 Module address box plate in accordance with NFPA 72 and CAN ULC S524 Be to observe the polarity of the wires as shown in Figure 4 4 Module wiring control not V V PWR next out out in in D Class A 2 4 B Class B 2 4 k EOLR for B only Maximum 25 resistance per wire Maximum 12 AWG 2.5 sq mm wire minimum 18 AWG 0.75 mm2 wire Refer to the control panel technical reference manual for wiring specifications Maximum 23.8 VDC at 35 mA 4 3101192 REV 03 REB 25JAN13 line voltage fault impedance panel input power not power current detector current compatibility ID environment temperature range electrical boxes size address device circuit IDC resistor value circuit resistance circuit capacitance 20.6 V peak to peak k to 28.3 VDC mA mA mA to 120 0 to 49 to 93 RH noncondensing at 90 to 140 to 60 American 4 inch square in 64 mm deep 2 gang box 4 in square box 1 1 2 in mm deep 14 16 or 18 AWG wire 2.5 1.5 or 0.75 mm2 Sizes 16 and 18 are preferred to 64 64 point control panel to 127 127 point control panel k P N EOL 4.7 25 per wire 3101192 REV 03 REB 25JAN13 4 4 3101192 REV 03 REB 25JAN13