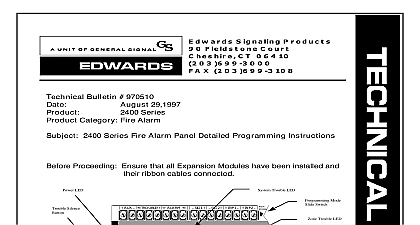
Edwards E-FS101 Panel Manual

File Preview
Click below to download for free
Click below to download for free
File Data
| Name | edwards-e-fs101-panel-manual-3016987254.pdf |
|---|---|
| Type | |
| Size | 762.42 KB |
| Downloads |
Text Preview
Product description FireShield single zone panel has one initiating device IDC and one notification appliance circuit NAC The is configured for Class B operation only buttons Resets the panel Silence and Drill zones 1 Class B zones 1 Class B voltage rating 24 Vfwr max current 1.0 A power 24 Vdc at 0.1 A auxiliary power with reset power 120 Vac 60 Hz 0.36 A contact Form C 30 Vdc at 1 A resistive load contact Form C 30 Vdc at 1 A resistive load batteries 4.5 Ah max environment 32 to 120 0 to 49 93 RH noncondensing and indicators RELAY TEST On when the panel has AC power On steady latched when there is an active alarm event the IDC On when there is a fault with a monitored circuit or component or when a circuit is disabled Trouble Flashes for charger or low battery trouble means placement trouble Also places the panel in the state Silenced On steady indicates that the NAC circuit is off silenced but the panel is still in alarm Fault On steady during an active ground fault Also the panel in the trouble state Relay Disable On when there is a disabled circuit Also the panel in the trouble state Single Zone Panel and Operating Instructions mode Silences active notification appliances Signal Silence a second time unsilences the The Signal Silenced LED indicates when the panel in alarm and operating with notification appliances Visible appliances may or may not turn off when Silence is pressed depending on JP1 JP2 settings mode Activates the drill function Turns appliances on according to JP1 JP2 settings does not place the panel in alarm or activate the alarm Pressing Drill a second time turns off the drill Silence Silences the panel sounder during an active or alarm event Relay Disable Deactivates the alarm relay and prevents from activating in a future alarm event Pressing Alarm Relay places the panel in the trouble state test Silence and Alarm Relay Disable Press the Panel and Alarm Relay Disable buttons simultaneously to do panel lamp test This lets you verify proper operation of the checklist Prepare the site Make sure the installation location is from construction dust and debris and extreme ranges and humidity Unpack the equipment Install the cabinet See the cabinet Remove the metal terminal shield Remove and save four screws that hold the terminal shield in place Set the panel jumpers See Jumper setup Review wire routing See Wire routing Connect the field wiring See Wiring diagrams or the label Meter for opens grounds and shorts before Connect AC power and ground See Wiring diagrams the panel label The panel can not be started on only Make sure that the AC power circuit breaker off before connecting wires to the terminal block Connect batteries See Wiring diagrams or the panel Install the metal terminal shield Be careful to align the shield correctly over the LEDs and buttons Use four screws that you removed earlier Test for proper operation See Operating the panel Sheet Single Zone Panel Installation and Operating Instructions P N 3100589 REV 1.0 6 synchronization per UL 1971 Both horns and strobes silence when alarm silence is activated with horn silence Used with Genesis and Enhanced horns and strobes Genesis and Enhanced Integrity maintain synchronization per UL 1971 For Genesis this allows connected horns to be silenced while on the same 2 wire circuit continue to flash until the is reset For Enhanced Integrity devices both horns and will remain activated until the panel is reset Aux power reset Causes a temporary interruption of aux power Reset is pressed This is so that four wire smoke can be reset If this is not set pressing Reset has no on the aux power output No aux reset with no jumper installed reset Resettable 24 Vdc on AUX PWR terminals aux reset Continuous 24 Vdc on AUX PWR terminals no aux reset aux reset verify alarm no alarm verification IDC type Selects the type and functionality of the IDC No alarm verification with no jumper installed alarm For circuits with smoke detectors and contact 2 wire smoke detector activations are verified and confirmed before activating an alarm 4 wire detectors and contact devices are not verified and considered as alarms A circuit can not be until devices are restored to normal and the panel is See the FireShield Single Zone ULI and ULC lists P N 3100592 for restrictions alarm verification For circuits with smoke detectors and devices All activations are immediately considered as A circuit cannot be restored until devices are restored normal and the panel is reset the cabinet can be surfaced mounted See the figure and table for framing and mounting dimensions surface mount the cabinet Position the cabinet on the finished wall surface Fasten the cabinet to the wall surface where indicated in cm in cm in cm in cm in cm mounting holes setup layout as seen on the circuit board and JP2 NAC output type Controls the output of the NAC Genesis with horn silence with no jumper installed choose one with horn silence For strobes and notification appliances that self a temporal pattern or where temporal pattern is not Universal 3 3 3 pattern required for evacuation by NFPA 72 Used when notification appliances are not of self generating a temporal pattern Used with Genesis and Enhanced Integrity horns and Genesis and Enhanced Integrity appliances maintain 3100589 REV 1.0 6 Sheet Single Zone Panel Installation and Operating Instructions routing wiring is power limited except for AC power and battery All wiring is supervised unless noted otherwise power and battery wiring Make sure to the AC cover when wiring is power limited wiring in the shaded and nonpower limited wiring in the area at all times supply circuit V 60 Hz 0.36 A dedicated branch diagrams following diagrams show field wiring AC power and wiring and RTU wiring wiring wiring battery circuit 24 Vdc capacity 4.5 Ah max lead acid batteries only Vdc Vdc Vac NO wire APPLIANCE CIRCUITS 2 3 4 8 B Style Y voltage 24 Vfwr current 1.0 A 50.0 F max k 1 2 W P N EOL4.7 impedance 13 DEVICE CIRCUITS 2 3 6 8 B Style B voltage 16.7 to 26.4 Vdc current 3.0 mA 50.0 F max 4.7 k 1 2 W P N EOL4.7 impedance 13 NO PWR