DSC PG9949-PG8949-PG4949 - Wireless PG 2-Button Key - Installation Manual - Eng - S-Chi - R001

File Preview
Click below to download for free
Click below to download for free
File Data
| Name | dsc-pg9949-pg8949-pg4949-wireless-pg-2-button-key-installation-manual-eng-s-chi-r001-1645092387.pdf |
|---|---|
| Type | |
| Size | 1.45 MB |
| Downloads |
Text Preview
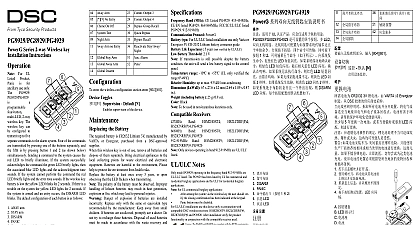
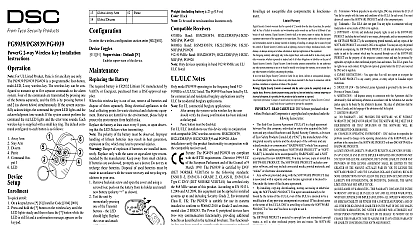
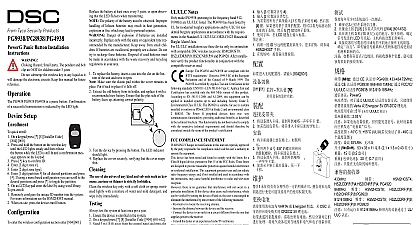
PG9949 PG8949 PG4949 2 Button Wireless Key Instructions Hazard Small parts The pendant and belt are NOT for children under 3 years not submerge the wireless key in any liquid as it damage the electronic circuits Keep this manual for future PGx949 is a programmable 2 button wireless key The can be configured to transmit up to three separate com to the alarm system Two of the commands are transmit by pressing one of the buttons separately and the third is by them simultaneously Confirmation of a successful is indicated by the LED light Settings button 1 Press for 1 second for 1 second button 3 Press button 4 Press and hold both buttons for more than 3 Setup quick enroll On a keypad press 8 Installer Code 000 Press and hold the button on the wire key until the LED lights steady and then release the button while the LED is still lit and a confirmation appears on the keypad Press on the keypad to confirm the device ID Enter 3 digit wireless key Assign the wireless key to a partition by entering the three partition To assign the wireless key to a user enter the 3 digit user pre enroll Remotely configure the unique ID number into the system more information see the HSM2HOST manual When on site press the button on the wireless key Buttons buttons are programmable change button programming From a keypad enter 8 Installer Code 804 601 to Bypass Recall Aux Alarm System Test Night Arm Global Stay Arm Global Away Arm Global Disarm enter the wireless configuration section enter 804 601 Toggles Supervision Default N supervision of the device to a Belt Clip Slide the device into the holder until you feel it snap To attach the belt clip slide it onto the rails on the rear of the inside Align the holder on a wall facing up as illustrated Using two 4 5 8 screws and wall anchors secure holder to the wall Slide the device into the holder you feel it snap securely Modifications to this wire key not expressly approved by the responsible for compliance may the user authority to operate it the Battery required battery is CR2032 Lithium 3V manufactured by or Energizer purchased from a DSC approved sup this wireless key is out of use remove all batteries and of them separately Bring electrical appliances to the collecting points for waste electrical and electronic equip Batteries are harmful to the environment please help to the environment from health risks the battery at least once every 5 years or upon observ that the LED flickers when transmitting The polarity of the battery must be observed Improper of lithium batteries may result in heat generation or fire which may lead to personal injuries Danger of explosion if batteries are installed Replace only with the same or equivalent type rec by the manufacturer Keep away from small chil If batteries are swallowed promptly see a doctor Do not to recharge these batteries Disposal of used batteries must made in accordance with the waste recovery and recycling in your area To replace the battery insert a coin into the slot on the bot Configure button 1 default arm using the table below of the unit and twist it open the desired two digit option Configure button 3 default disarm by entering the desired digit option Configure button 4 both buttons pressed simultaneously by the desired two digit option Make sure the elastic pad within the cover remains in Put it back in place if it falls off Extract the old battery from its holder and replace it with a new battery Ensure that the plus side of the faces up attaining correct polarity Disabled Disarm Instant Stay Arm Stay Arm Away Arm 9 No Entry Chime On Off Quick Exit Arm Interior Comm Output 1 Comm Output 2 Comm Output 3 Comm Output 4 Bypass Group Recall Test the device by pressing the button The LED indicator light Reattach the cover securely verifying that the cover snaps use of abrasives of any kind and solvents such as ker acetone or thinner is strictly forbidden the wireless key only with a soft cloth or sponge moist lightly with a mixture of water and mild detergent and it dry immediately test the system at least once per a year Ensure the device is enrolled in the system Stand 3 m 10 ft away from the control panel and press the Verify that the transmit LED lights and the control responds as programmed Operate the pendant from various locations within the area by the receiver to determine dead locations transmission is blocked by walls and large objects or by structural materials If dead marginal zones are a problem relocating the may improve the performance Band MHz CE Listed PG4949 433 434MHz listed PG8949 868MHz FCC IC UL ULC listed 912 919MHz Protocol PowerG type For UL ULC listed installation use only Varta or 3V CR 2032 Lithium battery consumer grade Life Expectancy 5 years not verified by UL ULC Battery Threshold 2.05 V If transmission is still possible despite the battery condi the unit will send a low battery signal to the control panel Range 10 to 55 UL ULC only verified range 0 up to max 93 RH non condensing LxWxD 53 x 33 x 11 mm 2.1 x 1.3 x 0.43 in 15 g 0.5 oz including battery 20 g 0.7 oz To be used in non hazardous locations only Receivers Band HSM2HOST4 HS2LCDRF P 4 HS2IC PG4920 Band HSM2HOST8 HS2LCDRF P 8 HS2IC Band HSM2HOST9 HS2LCDRF P 9 HS2IC PG9920 Only devices operating in band 912 919MHz are UL listed Notes model PG9949 operating in the frequency band 912 is UL ULC listed The PG9949 has been listed by UL commercial and residential burglary applications and by for residential burglary applications in accordance with requirements in the Standards UL1610 UL1023 ULC and ANSI SIA CP 01 2010 Control Panel Features for False Alarm Reduction For UL commercial burglary applications After arming the system via the wireless key the user should verify the confirmation has been indicated at the keypad Panic button must be disabled UL ULC installations use these device only in conjunction compatible DSC wireless receivers HSM2HOST9 HS2ICNRF P 9 and PG9920 After verify the product functionality in conjunction with compatible receiver used The PG4949 and PG8949 are compliant the RTTE requirements Directive 1999 5 EC the European Parliament and of the Council of 9 1999 The PG8949 is certified by Telefica to the following standards EN50131 3 EN50131 1 2 CLASS II EN50131 6 Type C Telefication BV certified only the 868 MHz variant of this product Accord to EN 50131 1 2006 and A1 2009 this equipment can be in installed systems up to and including Security Grade Environmental Class II UK The PG8949 is suitable for use systems installed to conform to PD6662 2010 at Grade 2 and class 2 BS8243 The Power G peripheral devices two way communication functionality providing addi benefits as described in the technical brochure This has not been tested to comply with the respective requirements and should therefore be considered out the scope of the product certification COMPLIANCE STATEMENT Changes or modifications to this unit not approved by the party responsible for compliance void the user authority to operate the equipment device has been tested and found to comply with the limits a Class B digital device pursuant to Part 15 of the FCC These limits are designed to provide reasonable protec against harmful interference in residential installations equipment generates uses and can radiate radio frequency and if not installed and used in accordance with the may cause harmful interference to radio and tele reception there is no guarantee that interference will not occur a particular installation If this device does cause such inter which can be verified by turning the device off and on user is encouraged