DSC TLink Configuration for DLS2002SA WEB
File Preview
Click below to download for free
Click below to download for free
File Data
| Name | dsc-tlink-configuration-for-dls2002sa-web-5732406918.pdf |
|---|---|
| Type | |
| Size | 1.15 MB |
| Downloads |
Text Preview
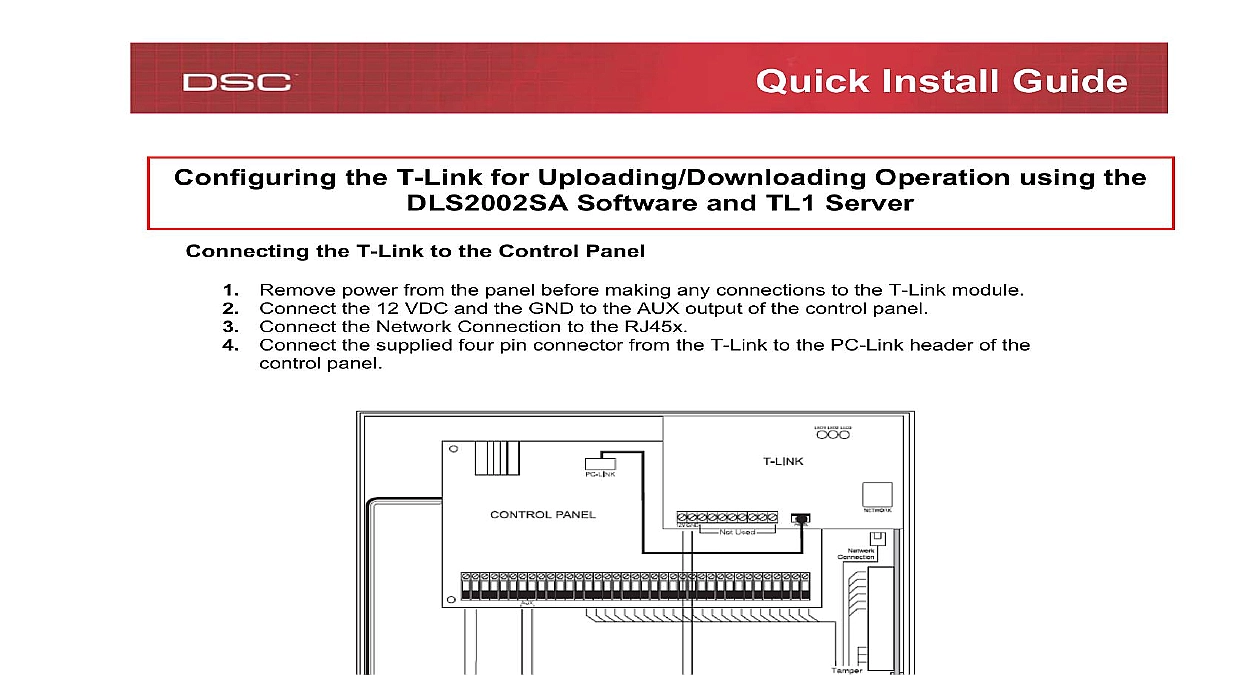
Quick Install Guide the T Link for Uploading Downloading Operation using the Software and TL1 Server the T Link to the Control Panel Remove power from the panel before making any connections to the T Link module Connect the 12 VDC and the GND to the AUX output of the control panel Connect the Network Connection to the RJ45x Connect the supplied four pin connector from the T Link to the PC Link header of the panel the T Link 001 002 003 004 999 IP Address Mask IP Address The computer IP Address Gateway your T Link enter data 55 in Section 999 up the TL1 Server Software Download the TL1 Server from the DSC website to www dsc com and login to the website Go to Products cid 206 Software cid 206 SurGard a new web page will appear Scroll down the page Below the heading Communicator save the following file to your computer Server V1.0 14.7MB exe Install Guide the TL1 Server Software on downloaded file and follow the Wizard to install the TL1 Server Software installed the icon shown below will appear on the desktop Double click on the icon run the program Server lnk Logging in to theTL1 Server Software in by entering the correct Login Name and Password Name admin password Password Expired following expired message will appear This is done for security reasons ensure the password is changed from default to prevent unauthorized access Click button Change the Password Install Guide the new password and re enter the password for verification in the correct field click The expiration date of the password may be extended under the USER tab Verify the T Link Account is Active Server Status is used to indicate the status of each T Link module connected box box box account connected module active module connected but not defined Install Guide view the IP address programmed for any active account simply roll the mouse over green or blue box The IP address will be displayed in the bottom left part of the The TL1 Server must be running in order to connect to the panel via DLS2002 SA software up the DLS2002SA Software Download the DLS2002SA Software to www dsc com and login to the website Go to Products cid 206 Software cid 206 DSC DLS a new web page will appear Under the pull down menu select DLS2002SA and a web page will appear Scroll down the page and below the heading Program Required Files save the following files to your computer 18.1MB Service Pack 18.9MB the heading Drivers save the following files TL 250 Driver exe DLS 2002SA PC4020 V3.5 exe or PC5020 v3.2SA exe it is only necessary to download the specific driver for the panel that you are using the Downloaded files and install each of the downloaded files in the order listed below 18.1MB Service Pack 18.9MB TL 250 Driver exe DLS 2002SA PC4020 V3.5 exe or PC5020 v3.2SA exe it is only necessary to install the specific driver for the panel that you are using Run the DLS2002SA Software the software has been installed the icon shown below will appear on the desktop on the icon to run the DLS2002SA software 2002 lnk The Security Stamp is used to encode every customer file to prevent unauthorized of the files Enter a Security Stamp up to 32 characters case sensitive and the button Keep record of the Security Stamp as it will be needed if the ever has to be reinstalled Install Guide DLS2002SA Software Log in the user name and password listed below to log on to the DLS2002SA program Name DSC 1234 Create a New Folder you logged into the DLS2002SA software click then click Folder The box will appear Install Guide the name for the folder to be created then click Verify the New Folder is Created the new folder has been created and is displayed below the Account Workspace Creating a New Account Install Guide then click Account Entering the Account Information an Account Name Panel Type and Panel Version then click Entering the TCP IP Settings Install Guide the IP address of the T Link in the appropriate field Select the Connect to T Link 1 box it has a checkmark then click Do not use leading zeros when entering the IP address Entering the Customer Information the customer information if required then click Entering Additional Comments Install Guide any additional comments if required then click Select the Folder to Store the New Account the folder to store the new account into The Folder should be highlighted then click Verifying the New Account is Created Install Guide account should be displayed If not verify the correct folder is highlighted in the List on the left side of the screen Adding TCP IP Support then click Configuration The following box will appear Install Guide IP support must be added to the DLS2002 software Click the pull down menu to select IP Connection then click Configure Outgoing Calls to use TCP IP Connection the Outgoing tab and under the scroll bar select IP Connection then click Setting the IP Address of the Server Install Guide the IP address of the computer running the TL1 Server in the TCP IP Module IP text field then click Do not use leading zeros when entering the IP address Finish DLS2002SA TCP IP Configuration to confirm the TCP IP connection Opening the Account for Uploading or Downloading Install Guide the account to open it Connecting to the Panel via the T Link using the DLS Software Install Guide cid 206 Connect Establishing Communication from the DLS to the T Link connected to the T Link the status bar will indicate Complete Confirming Communication is Established on the TL1 Server Install Guide account block on the TL1 Server will change to yellow when a DLS session is in Once the DLS session has been established information can be as required