Fire-Lite IPDACT Configurator Quick Guide
File Preview
Click below to download for free
Click below to download for free
File Data
| Name | fire-lite-ipdact-configurator-quick-guide-4927183506.pdf |
|---|---|
| Type | |
| Size | 992.87 KB |
| Downloads |
Text Preview
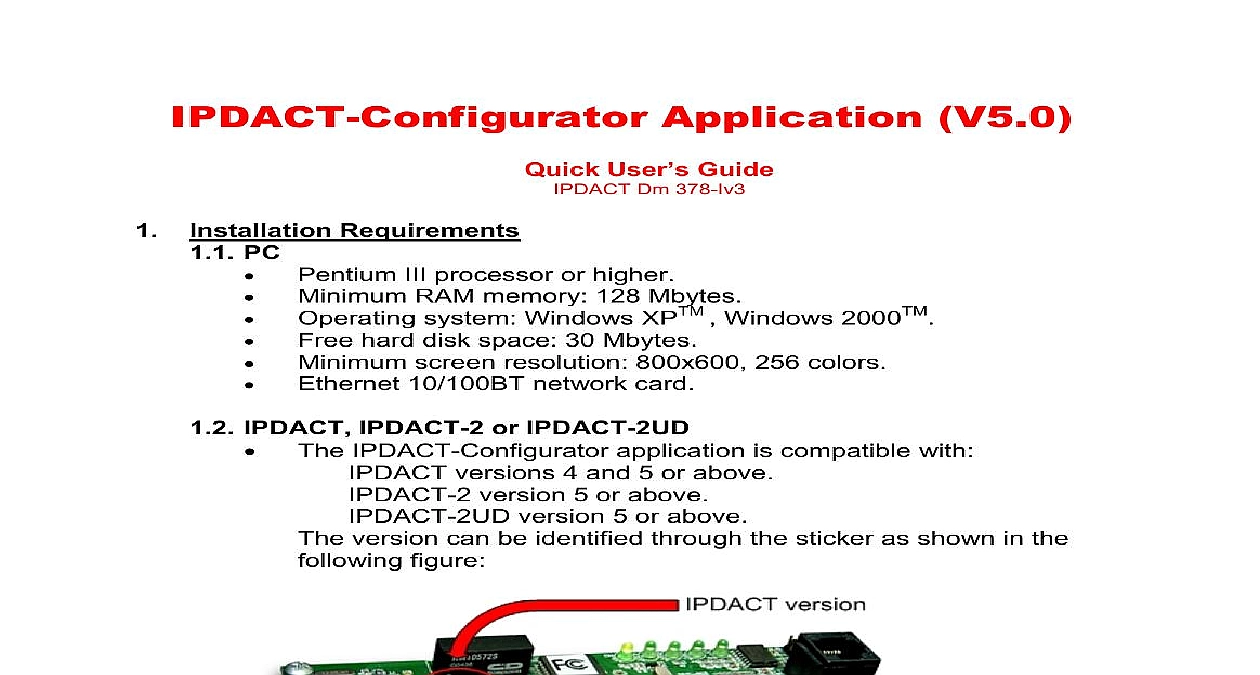
IPDACT Configurator Application V5.0 User Guide Dm 378 Iv3 Requirements PC III processor or higher Minimum RAM memory 128 Mbytes Operating system Windows XPTM Windows 2000TM Minimum screen resolution 800x600 256 colors hard disk space 30 Mbytes 10 100BT network card IPDACT IPDACT 2 or IPDACT 2UD IPDACT Configurator application is compatible with versions 4 and 5 or above version 5 or above version 5 or above version can be identified through the sticker as shown in the figure 1 Executing IPDACT Configurator main screen see Fig 2 appears on executing the application In this screen can select among the options Quick Install must select this option to configure the parameters needed to register the in a VisorALARM receiver Parameters lets you to modify local parameters that do not affect the communication VisorALARM Device Status this option to display the IPDACT status so problems can be diagnosed 2 the IPDACT using a crossover Ethernet cable you have directly connected the IPDACT with the PC using a crossover Ethernet without using any hub or switch you will need to use the auto feature of IPDACT in order to install the device the next steps in order to carry out the IPDACT installation 1 Install in the Mode group and in the box from the main screen 2 connecting with the IPDACT you need IP connectivity between the PC and the configuration steps for the PC IP address are described in the IPDACT Installation Guide this purpose if the IPDACT has the factory settings you must configure the PC an IP address from the 192.168.0 X network for example use 192.168.0.254 If IPDACT has another IP address you need to know that address and the in order to connect to the device 3 the IP address 192.168.0.100 or another known address and the password in appropriate fields on the main screen and click on the button to connection with the IPDACT 3 the connection is successful the Install configuration screen appears an error message appears indicating the problem Two situations could IPDACT IP address is incorrect or the IPDACT release is not compatible the application user password is invalid 3 4 4 the LAN Local Area Network where the IPDACT is going to be connected has a server you must fill in the next parameters in the Install screen see 5 Check the Enable DHCP client box This configures the device to use to get an IP address and gateway from a DHCP server in the LAN Account Number This is the IPDACT account number that identifies the and can be up to 8 digits long Main VisorALARM IP address and Backup VisorALARM IP address IP for the main and backup VisorALARM receivers UDP Port the receivers UDP port where the IPDACT sends alarms and messages Auto register password This is the registration password that the IPDACT use to connect to the VisorALARM and to obtain its configuration to STEP 6 5 5 the LAN does not have a DHCP server you must fill in the next parameters Uncheck the Enable DHCP client box This configures the device to use a IP address and gateway IP Address A static IP address for the device Mask IP subset mask the IPDACT pertains to Gateway This parameter is the IP address for the router accessing Account Number This is the IPDACT account number that identifies the and can be up to 8 digits long Main VisorALARM IP address and Backup VisorALARM IP address IP for the main and backup VisorALARM receivers UDP Port the receivers UDP port where the IPDACT sends alarms and messages Auto register password This is the registration password that the IPDACT use to connect to the VisorALARM and to obtain its configuration 6 on the button This sends and saves the above parameter values in IPDACT and restarts the device this moment the IPDACT starts trying to connect to the VisorALARM to registration and starts operating the IPDACT is in the auto registering process LED A remains flashing in green the registration is completed LED A stops flashing and LED E lights up in the IPDACT when it is connected to a hub or switch on the LAN the IPDACT and the PC are connected to the Local Area Network where the is going to operate you do not need to use the IPDACT auto feature and you can perform the registration online the next steps in order to carry out the IPDACT installation 1 Install in the Mode group and in the box from the main screen 2 the LAN has a DHCP server you must configure the PC to automatically obtain an address from the DCHP server the configuration steps for the PC IP address are in the IPDACT Configurator Installation Guide the LAN does not have a DHCP server go to STEP 6 3 on the Browser button The IP Configurator Tool will scan for the devices connected to the same LAN as the PC When the scan has finished will display a screen displaying the discovered devices 6 the IPDACT Configurator Tool discovers only one IPDACT then it is automatically and its IP address put in the Connection box IPDACT scanning is available for IPDACT and IPDACT UD v5 devices or above there is more than one device in the LAN you must locate the device through its Number The Serial Number appears on a sticker attached to the terminal strip the device see Fig 7 7 select the IPDACT from the list and click on the button The selected IP address will be put in the connection box 4 the IPDACT password is the factory default password 24680 you can click on the button to connect with the device In any other case enter the device in the Password box and click on the connection is successful the Install screen appears Contrariwise an message appears indicting the problem Two situations could arise IPDACT IP address is incorrect or the IPDACT release is not compatible the application 9 user password is invalid 8 5 in the next parameters in the Install screen see Fig 5 Check the Enable DHCP client box This configures the device to use to get an IP address and gateway from a DHCP server in the LAN Account Number This is the IPDACT account number that identifies the and can be up to 8 digits long Main VisorALARM IP address and Backup VisorALARM IP address IP for the main and backup VisorALARM receivers UDP Port the receivers UDP port where the IPDACT sends alarms and messages to STEP 9 6 a static IP address for the PC the configuration steps for the PC IP are described in the IPDACT Configurator Installation Guide the IPDACT has the factory settings you must configure the PC with an IP address the 192.168.0 X network for example use 192.168.0.254 If the IPDACT has IP address you need to know that address and the password in order to to the device 7 the IP address 192.168.0.100 or another known address and the password in

