Hochiki Graphix Quick-Start Guide V0 2
File Preview
Click below to download for free
Click below to download for free
File Data
| Name | hochiki-graphix-quick-start-guide-v0-2-5942071863.pdf |
|---|---|
| Type | |
| Size | 805.71 KB |
| Downloads |
Text Preview
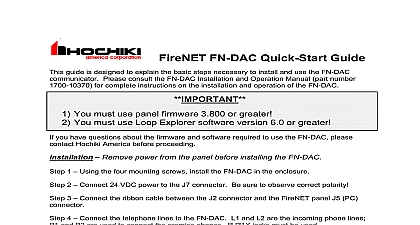
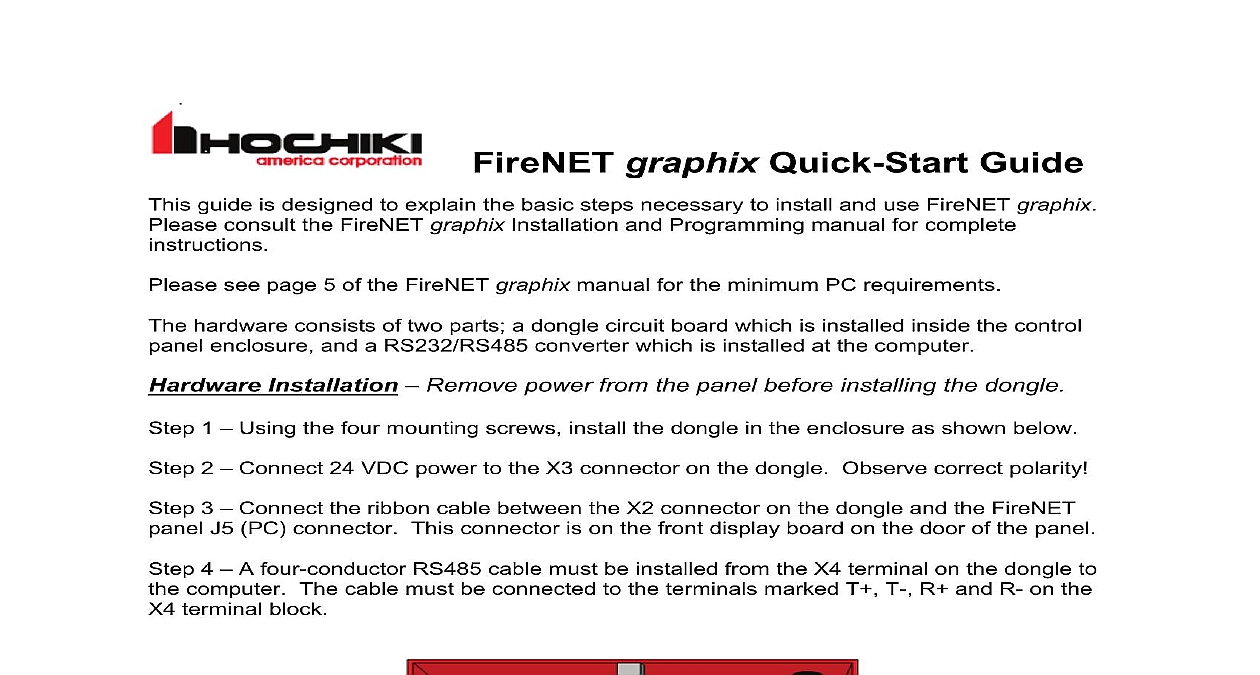
graphix Quick Start Guide guide is designed to explain the basic steps necessary to install and use FireNET graphix consult the FireNET graphix Installation and Programming manual for complete see page 5 of the FireNET graphix manual for the minimum PC requirements hardware consists of two parts a dongle circuit board which is installed inside the control enclosure and a RS232 RS485 converter which is installed at the computer Installation Remove power from the panel before installing the dongle 1 Using the four mounting screws install the dongle in the enclosure as shown below 2 Connect 24 VDC power to the X3 connector on the dongle Observe correct polarity 3 Connect the ribbon cable between the X2 connector on the dongle and the FireNET J5 PC connector This connector is on the front display board on the door of the panel 4 A four conductor RS485 cable must be installed from the X4 terminal on the dongle to computer The cable must be connected to the terminals marked T T R and R on the terminal block cable to PC 5 The RS232 RS485 converter must be installed at the computer and is connected to cable from the dongle Make the connections to the converter as follows Terminal Terminal X4 XMT XMT RCV RCV To X4 connector on dongle To RS232 RS485 converter X4 the converter to the computer COM port after the wiring is complete Reapply power to FireNET panel the CD into the CD ROM drive of the PC and wait for the installation to start Follow the instructions and click to each prompt unless you wish to change any of the folder Click when the installation has been completed Next In order to use FireNET graphix a project must be created FireNET graphix includes designer program that allows you to import maps and configuration data from Loop Explorer and edit images and zones set up device icons and much more get started with your project file select from the FireNET graphix program Start Programs FireNET graphix Designer exe Click on the Project tab select the New FireNET Project radio button Enter a name for your project and click You will be presented with the FireNET Designer Wizard screen Click to begin the prompts to build your project Please refer to the FireNET graphix Installation and manual for additional details on using the designer wizard Code In order to communicate with the FireNET network you must enter a security to unlock the dongle Please see section 2.4 of the FireNET graphix Installation and manual for details on obtaining and entering the unlock code After the project has been created and saved it may be used to monitor the fire alarm FireNET graphix Run is the main monitoring application Start Programs FireNET Run exe The Administrator password is all lower case Mode is possible to use FireNET graphix in Mode to test and demonstrate the product sample project can be used or you can create your own project For details please see 2.1 of the FireNET graphix Installation and Programming manual Note that the dongle is not required to operate FireNET graphix in simulation mode refer to the FireNET graphix Installation and Programming manual for information the set up and operation of graphix America Corporation Village Drive Suite 100 Park CA 90621 2268 graphix Quick Start Guide March 2008 revision 0.2