Mircom LT-6620 OpenGN to PRO-2000 Connection Instructions (English)
File Preview
Click below to download for free
Click below to download for free
File Data
| Name | mircom-lt-6620-opengn-to-pro-2000-connection-instructions-english-9753602841.pdf |
|---|---|
| Type | |
| Size | 2.76 MB |
| Downloads |
Text Preview
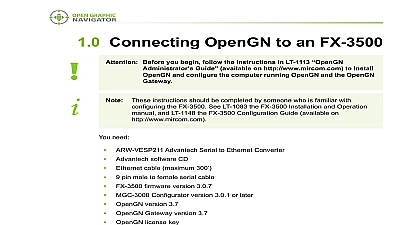
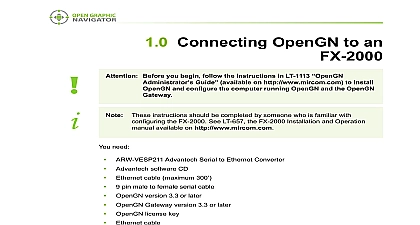
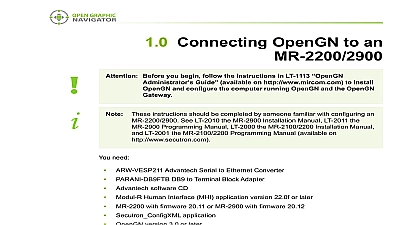
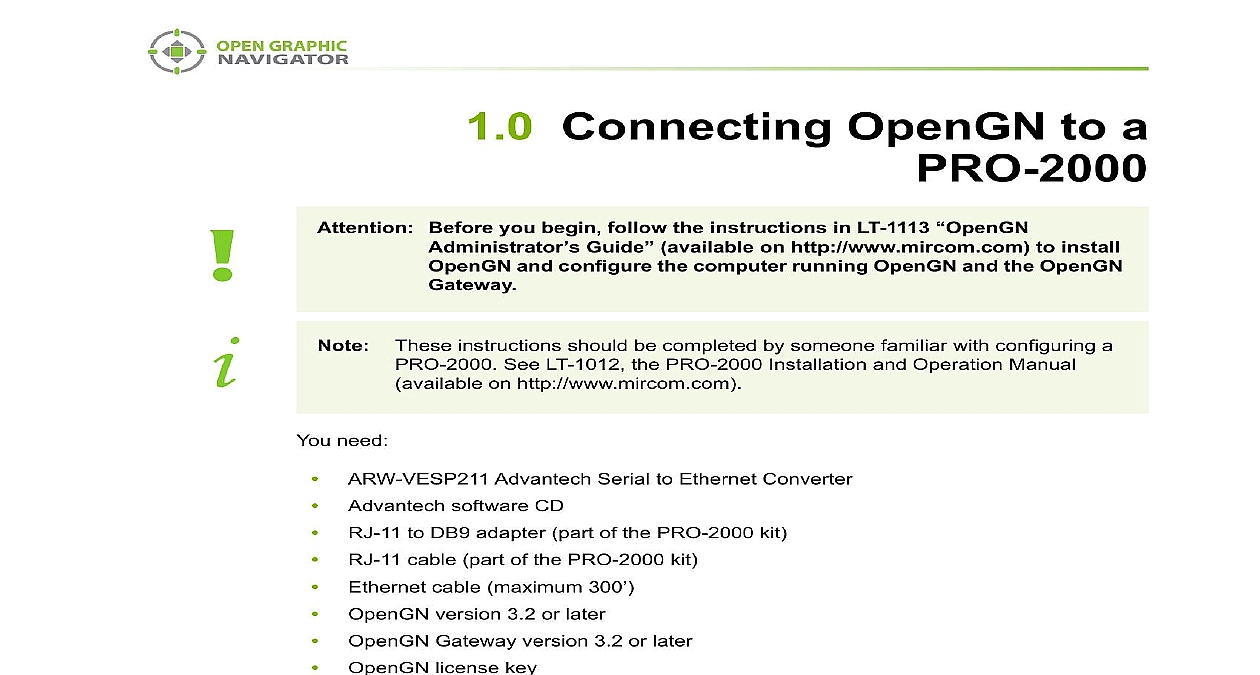
1.0 Connecting OpenGN to a Before you begin follow the instructions in LT 1113 Guide available on http www mircom com to install and configure the computer running OpenGN and the OpenGN instructions should be completed by someone familiar with configuring a See LT 1012 the PRO 2000 Installation and Operation Manual on http www mircom com need Advantech Serial to Ethernet Converter software CD to DB9 adapter part of the PRO 2000 kit cable part of the PRO 2000 kit cable maximum 300 OpenGN version 3.2 or later OpenGN Gateway version 3.2 or later OpenGN license key with firmware 5.14 or later software PRO 2000 System Configurator Overview connect OpenGN to a PRO 2000 you must Configure the PRO 2000 Generate the VDU File Convert the VDU File to XML Connect the PRO 2000 to the OpenGN Gateway with the ARW VESP211 Set the PRO 2000 to Communicate using Modbus Configure the ARW VESP211 Set up the VCOM Driver the XML file into OpenGN Configure the OpenGN Gateway the instructions below to complete these steps Rev 5 OpenGN to a PRO 2000 Configure the PRO 2000 Connect the PRO 2000 to the computer and configure it with the PRO 2000 System the Network tab of the Configurator provide the following information Rate Address this option number between 11 and 255 1 Tab of the Configurator Make a note of the Dest Address You will need it in a later step the General tab of the Configurator click Generate Modbus Address Make a note of the number beside MODBUS maximum register 2 Modbus Maximum Register Click OK Rev 5 Enter the number from step 4 in the MODBUS Max Reg field OpenGN to a PRO 2000 3 General tab Send the configuration file to the panel Generate the VDU File the PRO 2000 Configurator select Tools then select Generate VDU Generic File 4 Generate VDU Generic File VDU file is saved in the same directory as your other configuration files It is named Rev 5 Convert the VDU File to XML OpenGN to a PRO 2000 Copy the VDU file into the same folder as the PRO 2000 XML Generator software Right click the PRO 2000 XML Generator icon and then click Run as Administrator the PRO 2000 XML Generator window that appears provide the following Name ID Number Version Name Dest a name for the XML file or press Enter to use the job that was set in the PRO 2000 Configurator the file already exists the PRO 2000 XML Generator the date and time to the new file name a Job ID Number or press Enter to generate one you are creating a new version of an existing job use the Job ID Number a Job Version number or press Enter to generate one a Job Name or press Enter to use the job name that was in the PRO 2000 Configurator the number that you entered for Dest Address in the tab of the PRO 2000 Configurator section 1.2 on 2 Keep a record of this number You will need it in a later Wait for the process to complete When the process is complete press any key to continue Open the file Job Details csv and make a note of the numbers in the JobID and columns You will need these in a later step Each time that you run the PRO 2000 XML Generator it creates a new XML file updates the Job Details csv file with the name of the XML file the Job ID and Job Version associated with that XML file Rev 5 OpenGN to a PRO 2000 Connect the PRO 2000 to the OpenGN Gateway with the Connect the RJ 11 to DB9 adapter to the COM port on the ARW VESP211 Connect the RJ 11 cable to the same port on the PRO 2000 that you use for configuring PRO 2000 Connect the other end of the RJ 11 cable to the RJ 11 to DB9 adapter Use an Ethernet cable to connect the LAN port on the ARW VESP211 to the computer the OpenGN Gateway Connect the ARW VESP211 to the power CABLE 300 WITH GATEWAY CABLE TO DB9 ADAPTER 5 the ARW VESP211 to the OpenGN Gateway Computer Set the PRO 2000 to Communicate using Modbus the PRO 2000 panel that is connected to the ARW VESP211 set the rotary switch SW1 to Configure the ARW VESP211 Configure the OpenGN Gateway Computer to Connect to the order to initially connect to the ARW VESP211 the OpenGN Gateway computer must have specific IP address On the computer that the OpenGN Gateway is on click Start then click Settings Click Network and Internet Click Network and Sharing Center Click the Ethernet connection Rev 5 Ethernet Status window appears OpenGN to a PRO 2000 6 Status Click Properties Ethernet Properties window appears 7 Properties Double click Internet Protocol Version 4 TCP IPv4 Rev 5 Internet Protocol Version 4 TCP IPv4 Properties window appears OpenGN to a PRO 2000 8 Protocol Version 4 TCP IPv4 Properties Click Use the following IP address Type the following addresses address 169.254.102.40 mask 255.255.0.0 Click OK Install the Vlinx Serial Server Manager the Advantech CD into the OpenGN Gateway computer Vlinx Serial Server Manager Installation Wizard starts automatically 9 Welcome to the Vlinx Serial Server Manager Installation Wizard Follow the instructions on the screen to install the Vlinx Serial Server Manager Rev 5 OpenGN to a PRO 2000 Configure the ARW VESP211 On the OpenGN Gateway computer open the Serial Server Manager click Start B B Vlinx Vlinx Serial Server Manager Vlinx Serial Server Manager appears 10 Advantech Monitor Application Click I don know the IP address of the device Click Connect Vlinx Serial Server Manager looks for devices 11 Advantech Device Details Login screen for the ARW VESP211 device appears 12 Login screen Rev 5 OpenGN to a PRO 2000 Enter the Login password then click Login By default the password is blank General screen appears 13 General screen Enter a name that describes the panel that the device is connecting to for instance Select I want to change the password then enter the new password Click Save Keep a record of the password You will need it in a later step Click Network on the left sidebar Network screen appears 14 Network screen Enter the following information address Mask Gateway your network administrator for assistance The IP must be in the same range as the IP address of the running the OpenGN Gateway The gateway and mask must be the same as they are on the OpenGN computer example if the OpenGN Gateway computer IP address subnet mask are 192.168.1.10 and 255.255.255.0 then can enter 192.168.1.11 and 255.255.255.0 as the IP address and subnet mask Rev 5 OpenGN to a PRO 2000 Keep a record of the IP address You will need it in a later step ensure a constant connection to OpenGN you must assign a static IP address the ARW VESP211 Click Next Port 1 Settings screen appears 15 Port 1 Settings Select VCOM Mode Click Next Port 1 Serial screen appears 16 Port 1 Serial Select RS 232 in the Mode menu Click Next Under Save click the Save button and wait for the Login screen to appear Configure the OpenGN Gateway Computer Change the IP settings for the OpenGN Gateway computer to their previous values See 1.7.1 on page 5 for instructions on how to change the IP settings you need assistance contact your network administrator you are connecting the OpenGN Gateway computer to a PRO 2000 panel directly over enter an IP address that is different than the IP address of the PRO 2000 Enter the same subnet mask as the subnet mask on the panel Rev 5 OpenGN to a PRO 2000 Set up the VCOM Driver On the Login screen click Add VCOM 17 Add VCOM button The Add VCOM window appears 1