Notifier NRT KIT Installation Instructions
File Preview
Click below to download for free
Click below to download for free
File Data
| Name | notifier-nrt-kit-installation-instructions-3462879051.pdf |
|---|---|
| Type | |
| Size | 943.40 KB |
| Downloads |
Text Preview
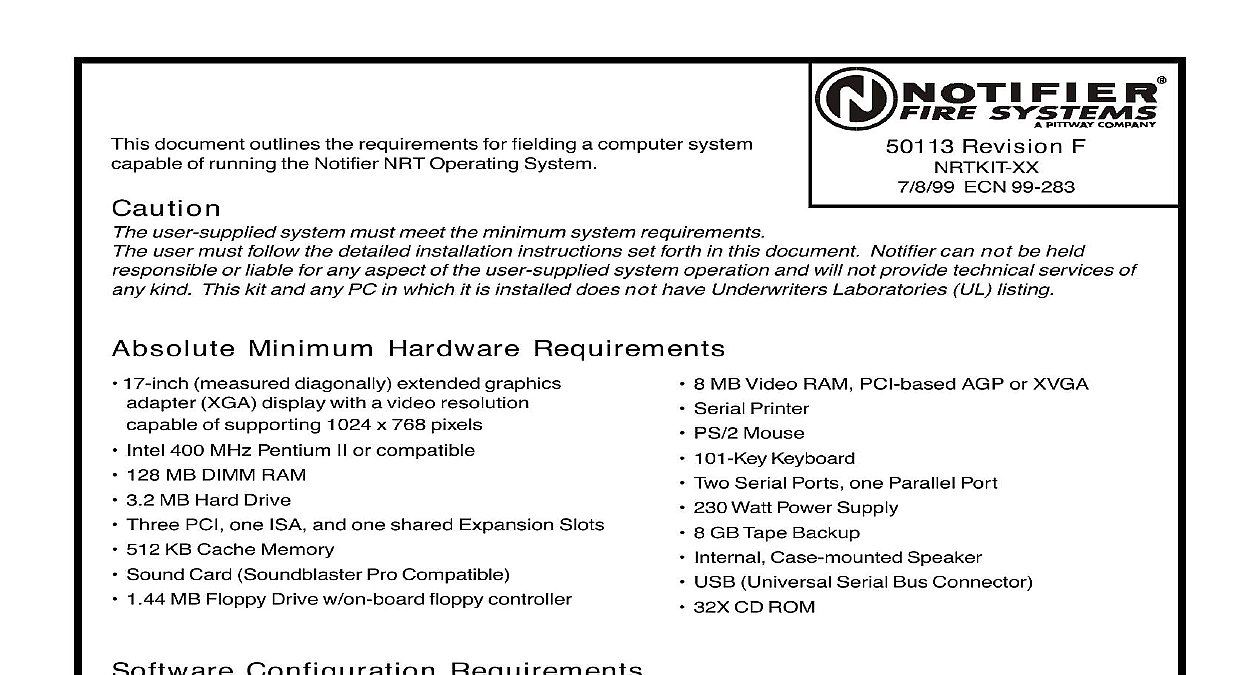
This document outlines the requirements for fielding a computer system of running the Notifier NRT Operating System Revision F ECN 99 283 user supplied system must meet the minimum system requirements user must follow the detailed installation instructions set forth in this document Notifier can not be held or liable for any aspect of the user supplied system operation and will not provide technical services of kind This kit and any PC in which it is installed does not have Underwriters Laboratories UL listing Minimum Hardware Requirements 17 inch measured diagonally extended graphics XGA display with a video resolution of supporting 1024 x 768 pixels Intel 400 MHz Pentium II or compatible 128 MB DIMM RAM 3.2 MB Hard Drive Three PCI one ISA and one shared Expansion Slots 512 KB Cache Memory Sound Card Soundblaster Pro Compatible 1.44 MB Floppy Drive w on board floppy controller 8 MB Video RAM PCI based AGP or XVGA Serial Printer PS 2 Mouse 101 Key Keyboard Two Serial Ports one Parallel Port 230 Watt Power Supply 8 GB Tape Backup Internal Case mounted Speaker USB Universal Serial Bus Connector 32X CD ROM Configuration Requirements Microsoft Windows NT 4.0 configured as follows DOS partition Starting Directory C Account as Administrator no password No network No printer PC name NRT NT Windows NT service pack 4 Secure Desktop Options Modem Microphone Intel DMI service manager for SE440BX fan supervision configured as follows No automatic notification of events Advanced Power Management sleep mode hotkey timeout disabled in CMOS Advanced Power Management sleep mode switch disabled in hardware Power switch modified in hardware to prevent turn off the computer Proper ESD grounding is required to the chassis of the computer The NRTKIT requires the use of two slots in the computer Windows is a registered trademark of Microsoft Corporation Manuals Online 50113 F 7 8 99 1 of 4 of the NRT NET Card card will assume COM Port 2 IRQ3 on your system You must ensure that no other card i e COM Port mouse is set to COM Port 2 or IRQ3 before proceeding 1.0 Remove case from the computer 2.0 Remove the two slot brackets from the computer 3.0 Install NRTKIT XX into the available two slots 4.0 Reassemble the computer 5.0 Turn on the computer Installing the NRT Software Insert the first installation disk must be a 3.5 disk in drive A In File Manager under the File Menu select RUN At the Command Line prompt type A Follow the NRT Installation program instructions 6.0 Install the NRT software by following the steps outlined below in sections 6.1 and 6.2 below Installing the NRT Database System following steps must be completed to copy the database files to the hard drive Note The database is for the NRT to work properly Log into Windows NT Insert the first NRT database disk must be a 3.5 disk in drive A In Program Manager under the File Menu select Run Type A and press OK the instructions on the screen After all files have been copied to the hard drive the following steps be completed to install the NRT database system In Program Manager under the File Menu select RUN Type C and press OK At the ODBC Driver Pack 3.0 Setup dialog box press CONTINUE Press the button to the left of CUSTOM At the ODBC Driver Pack 3.0 custom dialog box deselect SQLSERVER by highlighting it and then double Deselect ORACLE in the same manner as described in the previous step The check boxes should Highlight DESKTOP DRIVERS and press CHANGE OPTION At the ODBC Driver Pack 3.0 desktop drivers dialog box deselect all options except for MS Access and Engine Components as shown below and then press OK and CONTINUE with the mouse as shown below Desktop Drivers SQLServer Oracle ODBC components MS Access Driver Fox and dBase Driver Paradox Driver Text Driver Excel Driver Engine Components Help Files Manuals Online 50113 F 7 8 99 2 of 4 9 Press CONTINUE again to select the default Program Group name At the Data Sources dialog box press SETUP At the ODBC Microsoft Access 7.0 Setup type NFN32 in the Data Source Name text box Press OK At time the User Data Sources Driver text box contains NFN32 MICROSOFT ACCESS DRIVER MDB Press ADD and then OK At the ODBC Microsoft Access 7.0 Setup type NRT32 in the Data Source text box Press OK At this time the User Data Sources Driver text box contains ACCESS DRIVER MDB beneath NFN32 MICROSOFT ACCESS DRIVER MDB which was added the previous step Press OK Press CLOSE following steps must be completed for the final clean up to remove the files that were deselected in the steps Keep the NRT Database Disk 3 in Drive A In Program Manager under the File menu select RUN Type A and press OK 7.0 Windows NT Security Disable Procedure Optional the Windows NT environment a log on box is displayed requesting a user name and password each time NT starts up The Windows NT log on box may be disabled if the NRT software login function is for security or if the NRT software is to start automatically once Windows NT is running Once the software starts the user must still choose LOGIN under the FILE menu and enter a user name and pass to gain access to the NRT Note The Login function in the NRT software can not be eliminated To the Windows NT log on box execute the following steps From Program Manger go the FILE menu Select RUN and type regedt32 This brings up the Windows NT Go to the HKEY LOCAL MACHINE dialog box Double click on SOFTWARE then on MICROSOFT Double click on WINDOWS NT followed by CURRENTVERSION and then WINLOGON At this point the screen will split into two sections The section on the left side contains the tree structure of the registry and the side contains values stored in the registry From the EDIT menu select ADD VALUE A dialog box will pop up Under VALUE NAME type do not change the displayed data type Press OK Another dialog box will pop up Under STRING enter the current password of the NT adminis The password is case sensitive so be sure it is entered correctly Press OK for the change to effect From the EDIT menu select ADD VALUE again Under VALUE NAME type AutoAdminLogon Press OK STRING enter 1 do not change the displayed data type Verify that the two new variables entered in the previous steps appear on the right side of the screen variables should appear as follows Password is the password entered by the administrator in Step 6 Exit the Windows NT Registry and reboot Windows NT When Windows NT starts the log on screen be bypassed 7.1 Re Enable Procedure re enable Windows NT security follow steps 1 3 above Tab over to the right section of the screen and click the AutoAdminLogon variable From the Edit menu select Delete Press OK Do the same for the variable Exit the Registry and reboot Windows NT Manuals Online 50113 F 7 8 99 3 of 4 Manuals Online 50113 F 7 8 99 4 of 4