Potter PFC-6006 Quickstart Guide
File Preview
Click below to download for free
Click below to download for free
File Data
| Name | potter-pfc-6006-quickstart-guide-5172830649.pdf |
|---|---|
| Type | |
| Size | 7.23 MB |
| Downloads |
Text Preview
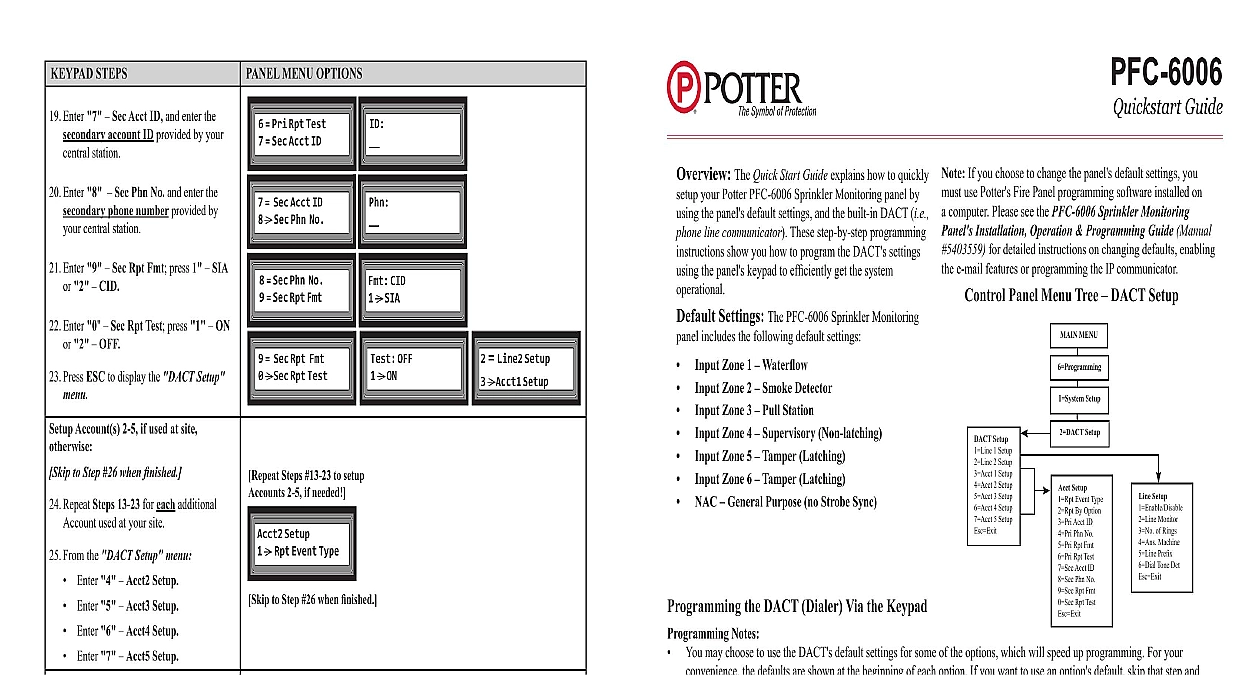
KEYPAD STEPS MENU OPTIONS Enter 7 Sec Acct ID and enter the account ID provided by your station Enter 8 Sec Phn No and enter the phone number provided by central station Enter 9 Sec Rpt Fmt press 1 SIA 2 CID Enter 0 Sec Rpt Test press 1 ON 2 OFF Press ESC to display the DACT Setup Account s 2 5 if used at site to Step 26 when finished Repeat Steps 13 23 for each additional used at your site From the DACT Setup menu Enter 4 Acct2 Setup Enter 5 Acct3 Setup Enter 6 Acct4 Setup Enter 7 Acct5 Setup Press ESC to exit the DACT Setup Press ESC again to exit the System menu Press ESC a 3rd time to exit the menu Press 1 to Accept or save all Press 2 to Cancel or not save Press Enter to accept and save changes Panel restarts to complete updated settings Pri Rpt Test Sec Acct ID Sec Acct ID Sec Phn No Sec Phn No Sec Rpt Fmt CID SIA Steps 13 23 to setup 2 5 if needed Setup Rpt Event Type to Step 26 when finished Sec Rpt Fmt Sec Rpt Test OFF ON Line2 Setup Acct1 Setup AC PWR Delay DACT Setup System Setup 1 ENTER to Changes beeps until you ENTER to OR ESC to save changes series of initialization display Electric Signal Company LLC St Louis MO Phone 866 956 0988 www pottersignal com REV A 09 14 The Quick Start Guide explains how to quickly your Potter PFC 6006 Sprinkler Monitoring panel by the panel default settings and the built in DACT i e line communicator These step by step programming show you how to program the DACT settings the panel keypad to efficiently get the system Settings The PFC 6006 Sprinkler Monitoring includes the following default settings NAC General Purpose no Strobe Sync Zone 1 Waterflow Zone 2 Smoke Detector Zone 3 Pull Station Zone 4 Supervisory Non latching Zone 5 Tamper Latching Zone 6 Tamper Latching Guide If you choose to change the panel default settings you use Potter Fire Panel programming software installed on computer Please see the PFC 6006 Sprinkler Monitoring Installation Operation Programming Guide Manual for detailed instructions on changing defaults enabling e mail features or programming the IP communicator Panel Menu Tree DACT Setup DACT Setup 1 Line 1 Setup 2 Line 2 Setup 3 Acct 1 Setup 4 Acct 2 Setup 5 Acct 3 Setup 6 Acct 4 Setup 7 Acct 5 Setup Esc Exit MENU Setup Setup Acct Setup 1 Rpt Event Type 2 Rpt By Option 3 Pri Acct ID 4 Pri Phn No 5 Pri Rpt Fmt 6 Pri Rpt Test 7 Sec Acct ID 8 Sec Phn No 9 Sec Rpt Fmt 0 Sec Rpt Test Esc Exit Line Setup 1 Enable Disable 2 Line Monitor 3 No of Rings 4 Ans Machine 5 Line Prefix 6 Dial Tone Det Esc Exit the DACT Dialer Via the Keypad Notes You may choose to use the DACT default settings for some of the options which will speed up programming For your the defaults are shown at the beginning of each option If you want to use an option default skip that step and onto the next one There are 2 ways to select menu options 1 by scrolling up down using the keypad arrows and pressing the Enter key or by entering the menu option number Both methods are provided in Steps 1 12 after that point only the menu option method is shown STEPS MENU OPTIONS From the panel keypad press Enter to the Main Menu Press the down arrow to scroll to and press Enter Enter 6 Programming Enter 1111 as the programming code Press Enter or 1 System Setup From the System Setup menu Press down arrow to scroll to DACT and press Enter Enter 2 DACT Setup Menu View History System Tools Programming Code System Setup Setup AC PWR Delay AC PWR Delay DACT Setup REV A 09 14 STEPS Phone Lines 1 2 Press Enter or 1 Line1 Setup Press Enter or 1 Enable Disable current status displays Enter 1 to Enable Enter 2 to Disable or scroll down Enter updated status displays briefly Scroll to Line Monitor and press Enter 2 Line Monitor current line monitor setting Enter 1 ON or 2 OFF Scroll to No of Rings and Enter 3 No of Rings current no of rings displays Enter the number of rings that the panel wait before answering if any Press Enter Scroll to Ans Machine and Enter 4 Ans Machine current answering machine setting displays Enter 1 ON or 2 OFF Scroll to Line Prefix and Enter 5 Line Prefix current line prefix setting Press up down arrows to select the prefix or pause character if at your site Press Enter Scroll to Dial Tone Det and Enter 6 Tone DET current dial tone setting displays Enter 1 ON or 2 OFF MENU OPTIONS Setup Line1 Setup Default Enabled The DACT can access telephone line Setup Enable Disable Enabled Enable Enable Disable changes are made the Line Enabled Change Success message displays if no changes are made the No Changes message displays Monitor Default Enabled This tells the DACT to monitor the phone line if the line voltage is not present or low a Trouble error displays Enable Disable Line Monitor Monitor ON ON ON OFF updated monitor setting Change Success or No Changes displays of Rings Default 3 rings This tells the DACT to pick up or answer incoming calls after 3 rings This option is used only if remote programming is required Line Monitor No of Rings No of Rings Ans Machine Rings 03 updated no of rings Change Success or No Changes displays Machine Bypass Default OFF This setting is used or turned ON only remote programming is required and the panel shares the phone line with another i e FAX machine Ans Machine Line Prefix Bypass OFF ON ON OFF updated ans machine bypass Change Success No Changes displays Prefix Default None This setting assumes that the DACT can directly access outside phone line without dialing an prefix such as an 9 or waiting for the phone to connect Enter a comma for each 1 second or pause that is required Ans Machine Line Prefix LinePrefix Dial Tone DET up down arrows repetitively to view the pause characters prefix numbers updated prefix setting Change Success No Changes displays Tone Detection Default ON The DACT listens for a phone line dial tone calling out to the central station Line Prefix Dial Tone DET Dial DET ON ON ON OFF updated dial tone setting Change Success No Changes displays STEPS MENU OPTIONS Press ESC when all information has been for Line 1 Scroll to Line2 Setup and Enter 2 Line2 Setup Setup Line2 options please refer to 3 Account 1 Press 3 Acct1 Setup Press 1 Rpt Event Type current report event type