Siemens EAD-3 Weatherproof Air Duct Detector Enclosure, Installation Instructions

File Preview
Click below to download for free
Click below to download for free
File Data
| Name | siemens-ead-3-weatherproof-air-duct-detector-enclosure-installation-instructions-5732106894.pdf |
|---|---|
| Type | |
| Size | 636.06 KB |
| Downloads |
Text Preview
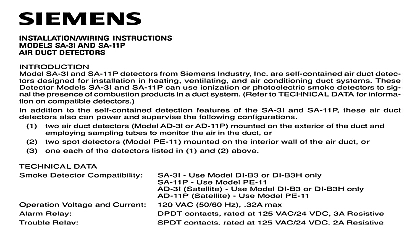
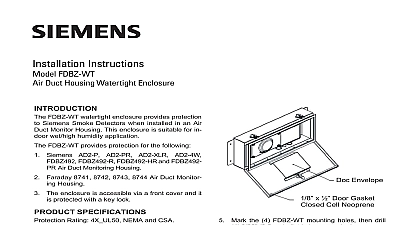
Installation Instructions EAD 3 Air Duct Detector Enclosure Industry Inc Technologies Division Park NJ 315 086215 7 Building Technologies Ltd Safety Security Products Kenview Boulevard Ontario 5E4 Canada Industry Inc Technologies Division Park NJ 315 086215 7 Building Technologies Ltd Safety Security Products Kenview Boulevard Ontario 5E4 Canada Duct Tube Hole 7 8 in ID Tube and PEM Nut Holes 1 4 in Stud Nut Plate Hole in Duct Push Nut Enclosure Back Gasket Housing Package Gasket Bonded 10 SS Flat Washer 10 External Tooth SS Lockwasher 10 SS Hex Nut 10 External Tooth SS Lockwasher x 1 Binding Head Screw Fitting Bushing Cover Gasket Bonded 10 SS Flat Washer x 1 2 Binding Head Screw 2 in in in in in Affix the adhesive backed template Item 1 in diagram to air duct Item 2 Refer to the appropriate Installation for information on detector locations 315 093234 315 086591 315 093235 315 086593 Using the template as a guide Drill or punch out the two 7 8 inch diameter holes 3 in the air duct that are needed for sam tubes 4 Drill or punch out four 1 4 inch diameter holes for the mounting studs 6 and two for the nuts 7 located on the mounting plate 8 the mounting plate with studs and PEM nuts the duct so that the studs extend out from the holes 9 If necessary cut a 12 inch by 12 access hole in the duct adjacent to the detector order to insert the mounting plate Attach two push nuts 10 to the studs to hold the the conduit fitting 20 and grounding bushing plate in place Mount the enclosure 11 on the studs Place one 12 on each stud Mount the air duct detector housing 13 on the studs the bonded gaskets 14 included at the rear of housing for improved sealing Fasten the enclosure and detector housing to the air by fastening them to the studs from the mounting using the flat washers 15 lockwashers 16 hex nuts 17 provided Use two external tooth lockwashers 18 and two bind head screws 19 to fasten the detector housing enclosure to the PEM nuts located on the mount plate the sampling tubes according to the instructions the appropriate manual listed in No 1 Complete the assembly according to the manual to the enclosure through the appropriate side hole Attach the conduit and ground When using a DA 3PS board it is necessary to the DA 3PS board Fasten a 14 or 18 AWG wire the grounding bushing to the terminal position marked on TB2 of the DA 3PS board Cover any unused holes on the enclosure sides with plugs 22 provided the detector before completing the housing according to the AIR DUCT DETECTOR referred to in Step 9 above the cover of the Model EAD 3 enclosure 23 on bonded gasket 24 ringing the face of the enclo Fasten the cover to the enclosure with flat 25 and binding head screws 26 access hole cut in the duct Step 3 above permits and cleaning of the sampling tubes however hole must be covered and sealed when not in use