Siemens VTO2001-U2 VTO2001-U3 Option Module (24 Switches), Installation Instructions

File Preview
Click below to download for free
Click below to download for free
File Data
| Name | siemens-vto2001-u2-vto2001-u3-option-module-24-switches-installation-instructions-2984730516.pdf |
|---|---|
| Type | |
| Size | 1.94 MB |
| Downloads |
Text Preview
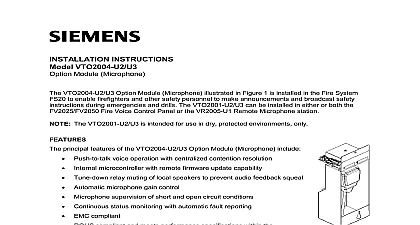
INSTRUCTIONS VTO2001 U2 U3 Module 24 Switches Model VTO2001 U2 U3 Option Module 24 Switches illustrated in Figure 1 is installed in the Fire Voice Control System and the VR2005 U1 Remote Microphone station to provide controls and LED status indicators for the programmable system control functions The VTO2001 U2 U3 is intended for use in dry protected environments only principal features of the VTO2001 U2 U3 Option Module 24 Switches include 24 illuminated pushbutton controls and 96 multi color LED status Modules are individually addressable Remote firmware update capability for the on board microcontroller Audio feedback confirms pushbutton operation All tri color LEDs can be OFF flashing or steady ON CAN bus data transfer EMC compliant ROHS compliant and meets performance specifications within the range Can be used in the UL and ULC markets 1 Option 24 Switches the CAN Bus Address two digit CAN Bus address for the VTO2001 U2 U3 Option Module 24 Switches is determined by two rotary DIP switches located on the back of the module as illustrated in Figure 2 The left switch the tens digit of the address while the right switch sets the ones digit of the address The CAN bus for each module is selected by the installer and may be set either before or after mounting the in the FV2025 2050 Fire Voice Control Panel or the VR2005 U1 Remote Microphone station to simplify addressing and avoid errors it is recommended that the module address be set after module is mounted in the Panel To set the CAN Bus address use a small flat bladed screwdriver to the center of each switch until the arrow points to the digit of the address which that switch CAN Bus addresses 1 5 are reserved for the VCI2001 U1 Voice Amplifiers and are not available option modules the Pushbuttons VTO2001 U2 U3 Option Module 24 Switches must be configured before operating the host Fire Voice Control Panel or VR2005 U1 Remote Microphone station This configuring is with the aid of the FS20 Engineering Tool as described in Siemens Industry Inc Building 1 Division document number A6V10315023 FS20 Fire Detection and Voice Announcement Configuration Manual CABLE LED SWITCH ONES DIGIT TENS DIGIT STRIP SLOT FOR STRIP VIEW VIEW 2 Option Module 24 Switches VTO2001 U2 U3 Option Module 24 Switches provides a series of programmable pushbuttons to specific fire alarm and suppression functions in up to 24 fire zones The yellow and the tri colored mounted to the left of each pushbutton indicate the status of the function controlled by the pushbutton Figure 2 An audio signal is generated when a button is pressed to indicate that the module has that action A label located between each pushbutton and its indicator LEDs identifies the function When an installation includes more than 24 fire zones a number of VTO2001 can be combined to provide the required number of pushbutton controls and LED indicators and Indicators purpose of each VTO2001 U2 U3 pushbutton and the meaning of the indicator lights are covered in document A6V10315023 FS20 Fire Detection and Voice Announcement System Configuration 2 electrical power prior to working on equipment VTO2001 U2 U3 Option Module 24 Switches is mounted on the inner door in both the Fire Voice Control Panel and the VR2005 U1 Remote Microphone station Open the outer and inner doors of the FV2025 2050 Fire Voice Control Panel or the Remote Microphone station FV2025 2050 Fire Voice Control Panel Please see Figure 3 Consult the site shop drawings to determine how many VTO2001 U2 3 Option Module Switches modules to mount in the middle and bottom windows of the Fire Voice Control Panel DOOR PANEL 1 RESERVED FOR OPTION MODULE WINDOW WINDOW 3 Module Mounting Positions on the FV2025 2050 Fire Voice Control Panel Inner Door VR2005 U1 Remote Microphone Please see Figure 4 Consult the site specific drawings to determine how many VTO2001 U2 3 Option Module Switches units to mount in the VR2005 U1 Remote Microphone station 3 MODULE MOUNTING POSITIONSYMBOLDEFINITION1firealarmresources com OPTION MODULE SWITCHES DOOR OPTION MODULE OPTION MODULE 4 Modules Mounted in the VR2005 U1 Remote Microphone Station An FCM2022 Option Module blank must be installed in any unoccupied mounting position of the door of the FV2025 2050 Fire Voice Control Panel or the V2005 U1 Remote Microphone Please see Figure 5 Mount each option module in its assigned position by sliding its top bottom mounting holes over the upper and lower mounting studs on the inside surface the inner door Use two 10 32 nuts to secure each option module to the inner door FCM2022 blanks if needed in any module mounting positions not occupied by a Option Module 24 Switches or a VTO2004 U2 U3 Option Module MOUNTING STUD NUT PER MODULE MOUNTING STUD OPTION BLANK SLOT FOR STRIP OPTION MODULE 24 5 the VTO2001 U2 U3 and the FCM2022 Option Module Blank 4 the Inscription Strips on the VTO2001 U2 U3 paper inscription strips into the left and right slots provided on the bottom rear of the VTO2001 module to identify the programmable functions associated with each control pushbutton The slots on the rear of the VTO2001 U2 U3 module are illustrated in Figure 5 inscription strips are normally printed during the panel configuration process detailed in Siemens Inc Building Technologies Division document number A6V10315023 FS20 Fire Detection and Announcement System Configuration Manual Templates for printing the inscription strips are in Siemens document A6V10321358 FS20 Fire Detection System Inscription Strips VTO2001 U2 U3 Option Module 24 Switches and the VTO2004 U2 U3 Option Module Microphone installed are connected in style to connector X102 on the VCA2002 A1 Card Cage using supplied 16 conductor ribbon cables Part I below provides wiring instructions for the option modules they are installed in the FV2025 2050 Fire Voice Control Panel Part II provides instructions for the option modules when they are installed in the VR2005 U1 Remote Microphone station To prevent cable damage use stick on cable supports to secure ribbon cables to the inner door of the FV2025 2050 Fire Voice Control Panel and the VR2005 U1 Remote Microphone station All ribbon cables and jumpers required for this procedure are supplied in the installation kit with the equipment all ribbon cables so that the red wire is connected to pin 1 of the mating board connector I Wiring the VTO2001 U2 U3 Option Module 24 Switches in the FV2025 2050 Panel ribbon cable routing will depend on whether any VTO2001 U2 U3 Option Module 24 Switches are in the bottom window of the FV2025 2050 Panel inner door there are no VTO2001 U2 U3 modules mounted in the bottom window use Wiring Procedure 1A and route the ribbon cables as illustrated in Figure 6 one or more VTO2001 U2 U3 is mounted in the bottom window use Wiring Procedure 1B and route the ribbon cables as illustrated in Figure 8 Wiring Procedure IA No VTO2001 U2 U3 modules mounted in the bottom window Please see Figure 6 Install a 16 conductor ribbon cable between connector X102 located on lower left corner of the backplane of the VCA2001 A1 Card Cage and connector X205 of right most VTO2001 U2 U3 module mounted in the middle window of the FV2025 2050 inner door ri