Silent Knight EVS-LOC Manual

File Preview
Click below to download for free
Click below to download for free
File Data
| Name | silent-knight-evs-loc-manual-2403168579.pdf |
|---|---|
| Type | |
| Size | 720.12 KB |
| Downloads |
Text Preview
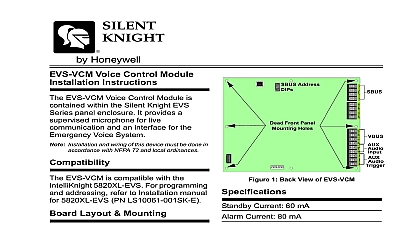
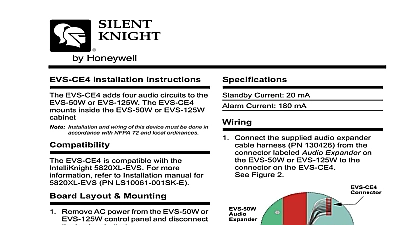
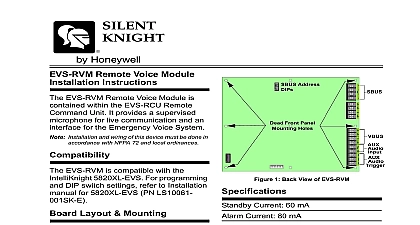
EVS LOC Local Operator Console Installation Document Clintonville Road Northford CT 06472 1610 USA FAX 203 484 7118 www silentknight com LS10189 001SK E A 07 01 2017 ECN 16 0218 Local Operator Console EVS LOC Local Operator Console is a EVS RVM Remote Voice Module its associated 6860 annunciator which is with the Emergency Voice System Installation and wiring of this device must be done accordance with NFPA 72 and local ordinances hinge pins are for the door the inner pins are for the dead front See 3 Remove AC power and disconnect the batteries from the main control mounting on interior walls use screws such as 10 sheet rock or screw to anchor into plaster When on concrete especially when moisture expected attach a piece of plywood to the surface and then attach the EVS LOC the plywood Mounting cabinet can be mounted on the wall surface using the mounting holes in the back of the Mark and predrill holes in the wall for the top keyhole mounting bolts using the in Figure 2 Place backbox over the top screws level secure remaining fasteners and tighten Shaped Holes Mounting Holes 2 Cabinet Mounting Holes Mounting these steps to recess mount the cabinet Cut a recess hole There should be 1.5 to edge to the exterior side of the 1 EVS LOC cabinet EVS LOC is compatible with the Honeywell Knight 5820XL EVS or 6820EVS more information refer to the FACP manual Ratings Current 100 mA Current 150 mA the Cabinet Remove doors by sliding them over the two in the hinge bracket of the base The to a FACP Figure 5 to properly wire the EVS LOC to FACP SBUS Supervised Power Limited 5 Wiring the to the FACP the Microphone install the microphone Clip the microphone into the microphone See Figure 6 of cabinet extruding from the wall this be measured from either the top or bottom edge to the exterior side of sheet rock Mount the cabinet to wall studs by inserting a through the cabinets side mounting into the wall stud To reinstall the doors the top hinge should aligned first followed by the lower Pin 3 EVS LOC Cabinet Layout Address Front Panel Holes 6 Hang Microphone into Microphone Clip microphone cord through hole at the of the dead front panel See Figure 7 4 Back view of ECS LOC board EVS LOC Installation Document P N LS10189 001SK E A 07 01 2017 7 Microphone Cord Inserted Through Dead Panel Hole Attach strain relief clip to microphone cord strain relief clip should have about 2 microphone cord through it See Figure 8 8 Installing Strain Relief Clip Push the strain into the hole in the dead front Restore AC power and reconnect the batteries Accessory Turn latch lock not intended for installations EVS LOC Installation Document P N LS10189 001SK E A 07 01 2017 Knight and Honeywell are registered trademarks of Honeywell International Inc