Silent Knight IFP2000VIPopcard
File Preview
Click below to download for free
Click below to download for free
File Data
| Name | silent-knight-ifp2000vipopcard-1078659234.pdf |
|---|---|
| Type | |
| Size | 809.84 KB |
| Downloads |
Text Preview
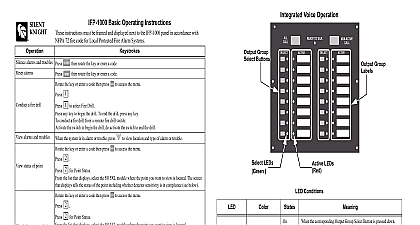
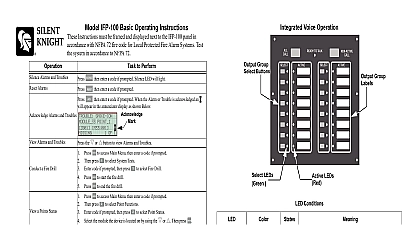
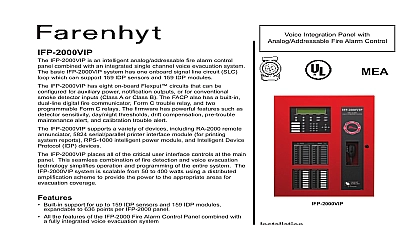
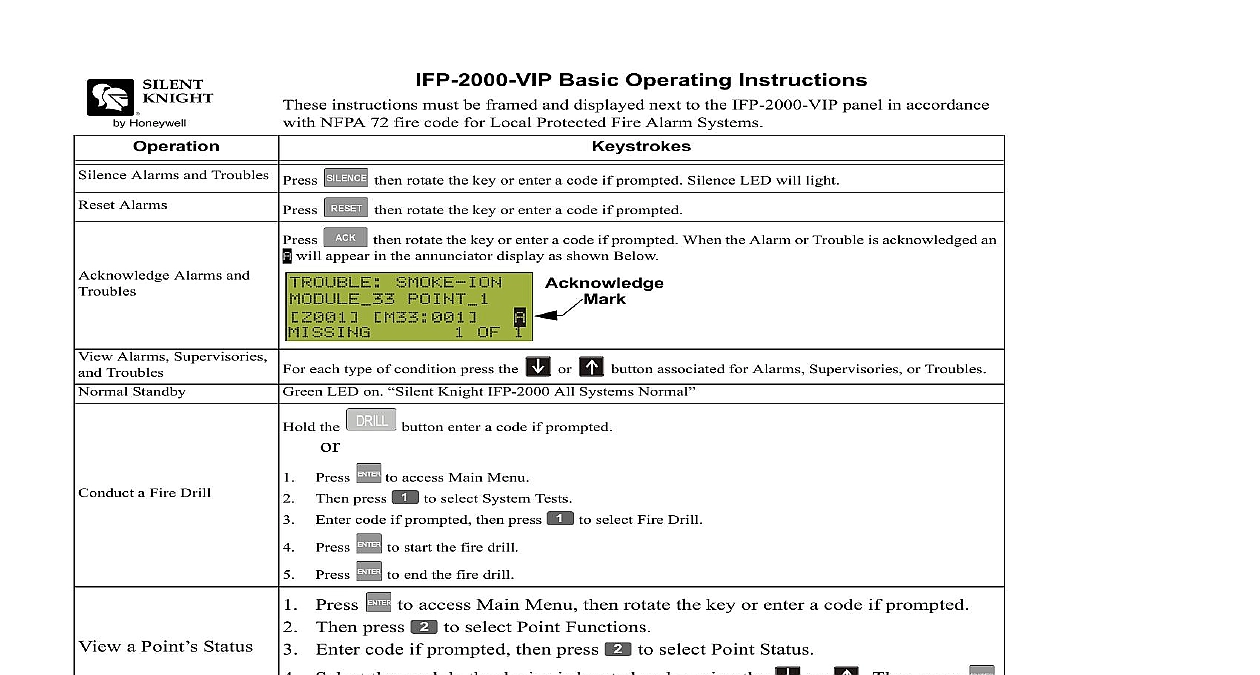
IFP 2000 VIP Basic Operating Instructions instructions must be framed and displayed next to the IFP 2000 VIP panel in accordance NFPA 72 fire code for Local Protected Fire Alarm Systems then rotate the key or enter a code if prompted Silence LED will light Alarms and Troubles Press Alarms Alarms and then rotate the key or enter a code if prompted will appear in the annunciator display as shown Below then rotate the key or enter a code if prompted When the Alarm or Trouble is acknowledged an Alarms Supervisories Troubles Standby each type of condition press the LED on Knight IFP 2000 All Systems Normal or button associated for Alarms Supervisories or Troubles a Fire Drill a Point Status Detector Time and Date button enter a code if prompted the press code if prompted then press to select System Tests to access Main Menu to select Fire Drill to start the fire drill to end the fire drill to access Main Menu then rotate the key or enter a code if prompted to select Point Functions Press Then press Enter code if prompted then press Select the module the device is located on by using the Enter the point number Follow steps 1 through 5 for viewing a point status Press to view detector sensitivity to select Point Status or Then press to select Set Time Date Enter a code if prompted to access Main Menu Press Then press Make changes in the fields on the screen as necessary Press Press if you wish to keep the changes to set the entered time and date Disable a Event History to access Main Menu then rotate the key or enter a code if prompted to select Point Functions Press Then press Enter code if prompted then press Select the module the point is located on by using the Enter the point number to select Disable Enable Pt or Then press Press Press Press the to access Main Menu then rotate the key or enter a code if prompted to select Event History or to view events in the history buffer Voice Operation Group Group Buttons LEDs LEDs Conditions LEDs LEDs To Talk the corresponding Output Group Select Button is pressed down the corresponding Output Group Select Button is deselected the corresponding output group is activated by the control panel the corresponding output group is not activated that the user can now speak into the microphone that the microphone is not ready to speak into Note the must be keyed first befor the Ready to Talk LED will Light Output Groups to for Microphone override all output group for microphone override all non activated output groups for override the button corresponding to the output group you desire to activate with the Key the microphone wait for the Ready to Talk LED to light then deliver verbal message the All Call button Key the microphone wait for the Ready to Talk LED to light deliver your verbal message the Non Active Call button then key the microphone Wait for the Ready to Talk to light then deliver your verbal message 151441 Rev A