Simplex 4120 UT RF Shields Installation Instructions

File Preview
Click below to download for free
Click below to download for free
File Data
| Name | simplex-4120-ut-rf-shields-installation-instructions-8017963524.pdf |
|---|---|
| Type | |
| Size | 591.62 KB |
| Downloads |
Text Preview
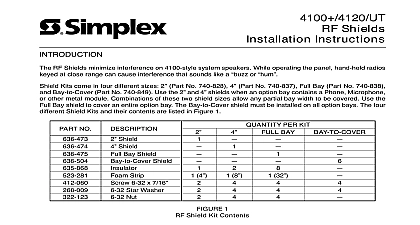
4100 4120 UT Shields Instructions RF Shields minimize interference on 4100 style system speakers While operating the panel hand held radios at close range can cause interference that sounds like a or Kits come in four different sizes 2 Part No 740 828 4 Part No 740 837 Full Bay Part No 740 838 Bay to Cover Part No 740 849 Use the 2 and 4 shields when an option bay contains a Phone Microphone other metal module Combinations of these two shield sizes allow any partial bay width to be covered Use the Bay shield to cover an entire option bay The Bay to Cover shield must be installed on all option bays The four Shield Kits and their contents are listed in Figure 1 PER KIT BAY NO Shield Shield Bay Shield Shield Strip 6 32 x 7 16 Star Washer Nut 4 8 32 1 Shield Kit Contents of the Bay to Cover RF Shield Kit install the Bay to Cover RF Shield Kit into the option bays follow Steps 1 through 6 below To install any type of shield kit you must open the option bay assembly To avoid a short with existing or shield kit hardware power down the system Remove the left and right screws 4 total which mount the trim brackets to the front of the option bay Place a Bay to Cover shield on the left and right side of the option bay between the trim bracket and option bay flange of the Bay to Cover shield should extend out from the option bay See Figure 2 Use the 6 32 x 7 16 and star washers supplied to attach the Bay to Cover shield Do not tighten Remove the eight screws along the top edge of the option bay and slide two Bay to Cover shields between the of the option bay and the assemblies mounted in the option bay The flange of the Bay to Cover shield extend out from the option bay See Figure 2 The Bay to Cover shields will extend past the left and right sides of the option bay Replace the eight screws removed in Step 3 with 6 32 x 7 16 screws and star washers supplied with each 2 4 shield at any location in which you installing a 2 or 4 shield Install the original screws and washers in Step 3 at any location which contains a Microphone enclosure Master Phone Meter Module or other insert which will not have a 2 or 4 shield behind it Do not tighten Repeat Steps 3 and 4 for the eight screws along the bottom of the option bay 1993 Simplex Time Recorder Co Gardner MA 01441 0001 U S A specifications and other information shown were current as of publication and are subject to change without notice 574 042 12 93 Manuals Online Align all the Bay to Cover shields so the edges touch and tighten all mounting screws fully of 2 4 RF Shield Kit install the 2 or 4 RF Shield Kit into the option bays follow Steps 7 through 10 below Remove any foam strips brackets or plastic plates from the inside front panel of the option bay the insulators supplied over the back of any PC boards mounted in the front panel of the option bay are not required if a blank plate is present Metal shields are keyed to allow clearance of the nut which holds the Microphone clip in the Microphone the metal shield over the insulator or blank plate and secure it with the star washer and nut supplied using the screws installed with the Bay to Cover shields Note proper alignment Cut the foam strip supplied as required and install it along the shield in place of the foam strips removed in 7 of Full Bay RF Shield Kit install the Full Bay RF Shield Kit into the option bays follow Steps 11 through 14 below Remove any foam strips brackets or plastic plates from the inside front panel of the option bay the insulators supplied over the back of any PC boards mounted in the front panel of the option bay are not required if a blank plate is present The metal shield has an access slot for existing cables Position the slot at the lower right or lower left of option bay may require longer cables not supplied the shield over the rear of the option bay with the star washers and nuts supplied while using the screws with the Bay to Cover shields Note proper alignment Cut the foam strip supplied in half and install it along the metal shield in place of the foam strips removed in 11 BAY OR OTHER 2 Shields Manuals Online 574 042 12 93


