Wheelock CH70-24MCW chime strobes install sheet P83932

File Preview
Click below to download for free
Click below to download for free
File Data
| Name | wheelock-ch70-24mcw-chime-strobes-install-sheet-p83932-3056941287.pdf |
|---|---|
| Type | |
| Size | 1013.46 KB |
| Downloads |
Text Preview
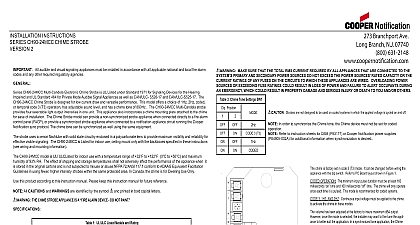
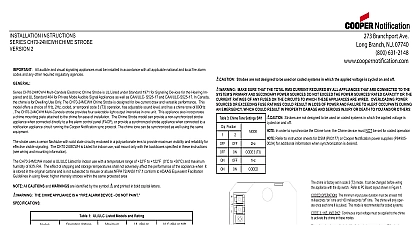
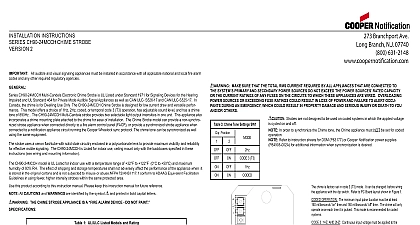
INSTALLATION INSTRUCTIONS CH70 24MCW CHIME STROBE 2 All audible and visual signaling appliances must be installed in accordance with all applicable national and local fire alarm and any other required regulatory agencies CH70 24MCW Multi Candela Electronic Chime Strobe is UL Listed under Standard 1971 for Signaling Devices for the Hearing Im and UL Standard 464 for Private Mode Audible Signal Appliances as well as CAN ULC S526 16 and CAN ULC S525 16 In Canada chime is for Dwelling Use Only The CH70 24MCW Chime Strobe is designed for low current draw and versatile performance This model a choice of 1Hz 2Hz coded or temporal code 3 T3 operation has adjustable sound level and has a chime tone of 890Hz The Multi Candela strobe provides four selectable light output intensities in one unit This appliance also incorporates a chime plate attached to the chime for ease of installation The Chime Strobe model can provide a non synchronized strobe appliance connected directly to a fire alarm control panel FACP or provide a synchronized strobe appliance when connected to a notification circuit running the Cooper Notification sync protocol The chime tone can be synchronized as well using the same equipment strobe uses a xenon flashtube with solid state circuitry enclosed in a polycarbonate lens to provide maximum visibility and reliability for visible signaling The CH70 24MCW is Listed for indoor use wall mount only with the backboxes specified in these instructions wiring and mounting information The CH70 24MCW model is UL Listed for indoor use with a temperature range of 32 to 122 to 50 and maximum humidity of 93 RH The effect of shipping and storage temperatures shall not adversely affect the perfor of the appliance when it is stored in the original cartons and is not subjected to misuse or abuse NFPA 72 ANSI 117.1 conform to Equivalent Facilitation Guidelines in using fewer higher intensity strobes within the same protected area 3 Chime Tone Settings SW1 Position 2 3 T3 MAKE SURE THAT THE TOTAL RMS CURRENT REQUIRED BY ALL APPLIANCES THAT ARE CONNECTED TO THE PRIMARY AND SECONDARY POWER SOURCES DO NOT EXCEED THE POWER SOURCES RATED CAPACITY OR THE RATINGS OF ANY FUSES ON THE CIRCUITS TO WHICH THESE APPLIANCES ARE WIRED OVERLOADING POWER OR EXCEEDING FUSE RATINGS COULD RESULT IN LOSS OF POWER AND FAILURE TO ALERT OCCUPANTS DURING EMERGENCY WHICH COULD RESULT IN PROPERTY DAMAGE AND SERIOUS INJURY OR DEATH TO YOU AND OR OTHERS Strobes are not designed to be used on coded systems in which the applied voltage is cycled on and off In order to synchronize the Chime tone the Chime device must NOT be set for coded Refer to instruction sheets for DSM P83177 or Cooper Notification power supplies P84905 for additional information when synchronization is desired this product according to this instruction manual Please keep this instruction manual for future reference All CAUTIONS and WARNINGS are identified by the symbol and printed in bold capital letters THE CHIME APPLIANCE IS A ALARM DEVICE DO NOT PAINT Table 1 UL Listed Models and Rating Voltage VRMS Current Only A dBA at Feet dBA at 10ft Min 2 UL ULC Current Ratings Strobe Only RMS Current Amps Voltage VDC VDC CANDELA SETTING WILL DETERMINE THE CURRENT DRAW OF THE PRODUCT strobe will produce 1 flash per second over the Input Voltage range strobes meet the required light distribution patterns defined in UL 1971 chime produces a brief inrush current of 0.100 Amps with filtered DC input 0.140 Amps with full wave rectified VRMS input with a duration of 100 milliseconds The Code 3 temporal pattern 1 2 second on 1 2 second off 1 2 second on 1 2 second off 1 2 second on 1 1 2 off and repeat is by ANSI and NFPA 72 for standard emergency evacuation signaling When calculating the total currents for two wire chime strobe mode use Table 2 to determine the highest value of RMS current for individual strobe and add in the chime current from Table 1 multiply this value by total device current for a given NAC Be sure to add the for any other appliances including audible signaling appliances powered by the same source and to include any required safety In four wire mode the total current draw for the strobe circuit and for the chime circuit must be calculated separately appliances were tested to the voltage limits of 16.0 33.0 volts for 24V models using filtered DC or unfiltered Full Wave Rectified Do not apply voltage outside of this range Refer to the installation instructions for the appropriate NAC to find the maximum allowed voltage drop Use this value along with the for the appliance to determine the allowable wire resistance The maximum wire resistance between strobes shall not exceed ohms chime is factory set in code 3 T3 mode It can be changed before wiring the with the dip switch Refer to PC Board layout shown in Figure 1 OPERATION The minimum input pulse duration must be at least 160 mil time and 160 milliseconds time The chime will only operate once time it is pulsed This mode is recommended for coded systems 3 1HZ AND 2HZ Continuous input voltage must be applied to the chime to the chime in these modes volume has been adjusted at the factory to insure maximum dBA output However the mode is selected the installer may want to fine tune the appliance to better the application In a synchronized tone application the Chime will default to tempo code 3 no matter what the DIP switches are set to cannot be set to coded Figure 1 AND MOUNTING INFORMATION following figures show the maximum number of field wires conductors that can enter the backbox used with each mounting option If limits are exceeded there may be insufficient space in the backbox to accommodate the field wires and stresses from the wires could the product Check that the installed product will have sufficient clearance and wiring room prior to installing backboxes and conduit if sheathed multiconductor cable or 3 4 conduit fittings are used A Figure B Branchport Ave Long Branch N J 07740 800 631 2148www coopernotification comCopyright 2018 Cooper Wheelock Inc dba Cooper Notification All rights reserved firealarmresources com PROCEDURES model can be flush mounted to a 4 square by 2 1 8 deep backbox with a 4 square 1 1 2 extension ring or to a surface mounted Backbox Mounting hardware for each mounting option is supplied entrances to the backbox should be selected to provide sufficient wiring clearance for the installed product Do not pass addi wires used for other than the signaling appliance through the backbox Such additional wires could result in insufficient wiring space the signaling appliance terminating field wires do not use more lead length than required Excess lead length could result in insufficient wiring space for signaling appliance care and proper techniques to position the field wires in the backbox so that they use minimum space and produce minimum stress the product This is especially important for stiff heavy gauge wires and wires with thick insulation or sheathing model has an integrated mounting plate which must be oriented correctly when it is mounted to the backbox Turn the mounting plate that the arrow above the words Strobe or points to the top side of the mounting plate move selector switch insert screwdriver into slot shown on the bottom side of the strobe See Figure 5 the chime mounting plate to the backbox with the cone protector on After the chime mounting plate is attached to the backbox the cone protector before installing the grille Next attach the grille to the chime mounting plate and attach with 2 screws 110 Candela Strobe setting is Listed for use in sleeping or non sleeping areas when installed in accordance with appropriate NFPA and the Authority Having Jurisdiction INSTALLATION OF 110 CANDELA STROBE PRODUCTS IN SLEEPING AREAS SHOULD BE WALL MOUNTED AT 24 BELOW THE CEILING AS FOLLOWS 1 THE ON AXIS DIRECTLY IN FRONT OF LENS LIGHT OUTPUT SHOULD DIRECTED AT THE EYELIDS OF THE SLEEPING PERSON E G PILLOW END OF BED BED HEAD 2 NO PART OF THE SHALL BE MORE THAN SIXTEEN 16 FEET FROM THE STROBE NOTIFICATION APPLIANCE INSTALLERS MUST ADVISE AND OPERATORS OF BUILDINGS WITH SLEEPING OCCUPANTS