Wheelock CVX bells installation sheet

File Preview
Click below to download for free
Click below to download for free
File Data
| Name | wheelock-cvx-bells-installation-sheet-9476320158.pdf |
|---|---|
| Type | |
| Size | 681.49 KB |
| Downloads |
Text Preview
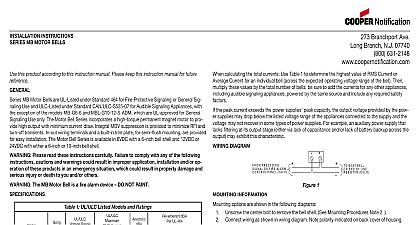
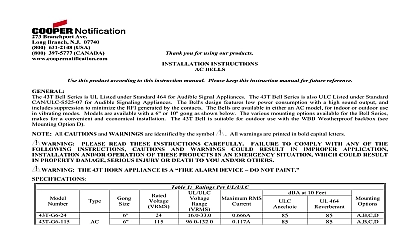
273 Branchport Ave Branch N J 07740 631 2148 Thank you for using our products INSTRUCTIONS PROOF BELLS this product according to this instruction manual Please keep this instruction manual for future reference Notification explosion proof bells are built for rugged reliable performance and are UL Listed for hazardous atmospheres Proven in long term as loud signals in mining chemical processing grain storage refineries and other industries All CAUTIONS and WARNINGS are identified by the symbol All warnings are printed in bold capital letters READ THESE INSTRUCTIONS CAREFULLY FAILURE TO COMPLY WITH ANY OF THE FOLLOWING INSTRUCTIONS AND WARNINGS COULD RESULT IN IMPROPER APPLICATION INSTALLATION AND OR OPERATION OF THESE PRODUCTS IN EMERGENCY SITUATION WHICH COULD RESULT IN PROPERTY DAMAGE SERIOUS INJURY OR DEATH TO YOU AND OR OTHERS Single Single Stroke 1 dBA at Feet Anechoic DIAGRAM Outdoor Models 1 OR BELL OR END OF LINE RESISTOR IF APPLICABLE 2015 Cooper Wheelock Inc dba Cooper Notification All rights reserved G 1 of 3 INFORMATION 2 FOR CONDUIT 5 16 MAX MAX 4 SHELL DIA MAX 1 2 FOR CONDUIT Figure 3 5 Figure 6 HARDWARE BE APPROPRIATE THE SURFACE TO WHICH BELL IS TO BE INSTALLED Template not to Scale G 2 of 3 Models Only STEPS 1 Remove 4 screws which hold the guard to the dome Remove guard by pulling towards the bottom of the bell 2 Loosen 2 screws on rear of dome that hold dome to the bell housing Remove dome by sliding up toward top of bell 3 Remove bell shell center bolt and remove bell shell 4 Mount Bell Housing on wall using 4 mounting holes in base of housing with proper fasteners for type of wall material See Mounting Information 5 Remove six bolts and washers holding housing cover to backbox Open housing to locate terminal block 6 Remove and discard manufacturer test leads from the terminal block 7 Wire bell into system per National Electrical Code using terminals and top or bottom 1 2 threaded conduit entrance for wiring Top entrance is Models Models Only 8 Close cover and reinstall 6 bolts with 6 lock washers and tighten 9 Reassemble bell shell to housing per Step 3 Reassemble dome to housing per Step 2 Reassemble guard to dome per Step 1 NOTES 1 Anechoic dB ratings ar for free field anechoic conditions Such conditions are approximated in outdoor installations Indoor installations greater dB because of reflected sound energy Typical indoor sound output is significantly higher than rated anechoic 2 All bells will operate on coded systems up to 2 on off cycles per second 3 The Explosion Proof Bells are UL listed for the hazardous atmospheres listed below I GROUP B I GROUP C I GROUP D Atmospheres containing ethyl and ether vapors Atmospheres containing hydrogen or gases and vapors of equivalent hazard such as manufactured gas containing gasoline petroleum naphtha alcohols acetone benzene lacquer solvent vapors and natural Atmospheres containing flour starch and grain dusts Atmospheres containing carbon black coal or coke dust II GROUP F II GROUP G MATERIAL EXTRAPOLATED FROM THIS DOCUMENT OR FROM COOPER NOTIFICATION MANUALS OR OTHER DOCUMENTS THE PRODUCT FOR USE IN PROMOTIONAL OR ADVERTISING CLAIMS OR FOR ANY OTHER USE INCLUDING DESCRIPTION THE PRODUCT APPLICATION OPERATION INSTALLATION AND TESTING IS USED AT THE SOLE RISK OF THE USER AND COOPER WILL NOT HAVE ANY LIABILITY FOR SUCH USE Check the installation instructions of the manufacturers of other equipment used in the system for any guidelines or restrictions on wiring locating Notification Appliance Circuits NAC and notification appliances Some system communication circuits and or audio circuits for may require special precautions to assure electrical noise immunity e g audio crosstalk G 3 of 3