Wheelock Eluxa grilles install sheet P85764

File Preview
Click below to download for free
Click below to download for free
File Data
| Name | wheelock-eluxa-grilles-install-sheet-p85764-9685423710.pdf |
|---|---|
| Type | |
| Size | 777.34 KB |
| Downloads |
Text Preview
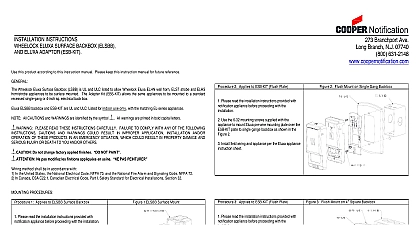
2 Grille Removal Single Gang Branchport Ave Branch N J 07740 631 2148 2 Applies to Single Gang GL series Grilles Strobe Models Note Candela Setting Window is on top right side existing grille from appliance Insert 3 16 straight screwdriver in slot and while away from wall surface See Figure 2 appliance settings are correct new grille over appliance Engage top snaps first Next pivot grille and pressure on bottom side above screw driver slot until grille saps into place Grille is attached Candela if applicable 3 Grille Removal Wall Mount 3 Applies to EL Wall Speaker and GLF Grilles Candela Tone setting if there is a window on lower right side existing grille from appliance Insert 3 16 straight screwdriver in slot and while away from wall surface See Figure 3 appliance settings are correct new grille over appliance Engage top snaps first Next pivot grille and pressure on bottom side above screw driver slot until grille snaps into Grille is attached Candela Tone Setting noted above p INSTRUCTIONS ELUXA SERIES GRILLES ELUXA LED APPLIANCES this product according to this instruction manual Please keep this instruction manual for future reference Wheelock Eluxa Series Grilles are designed to be replacements for use with EL series Strobes Speakers Speaker Strobes and Each EL Grille provides the same level of performance as the original while offering the customer an option of changing color and lettering EL series are injection molded with ABS and are impact resistant series grilles are UL Listed for indoor use only with the matching EL series appliances See Table 1 All CAUTIONS and WARNINGS are identified by the symbol All warnings are printed in bold capital letters PLEASE READ THESE INSTRUCTIONS CAREFULLY FAILURE TO COMPLY WITH ANY OF THE FOLLOWING CAUTIONS AND WARNINGS COULD RESULT IN IMPROPER APPLICATION INSTALLATION AND OR OF THESE PRODUCTS IN AN EMERGENCY SITUATION WHICH COULD RESULT IN PROPERTY DAMAGE AND INJURY OR DEATH TO YOU AND OR OTHERS Do not change factory applied finishes NOT PAINT Ne pas modifiez les finitions appliqu en usine PAS PEINTURER 1 UL Models and Ratings Options speaker ceiling speaker speaker strobe ceiling speaker strobe strobe ceiling strobe horn strobe ceiling horn strobe low frequency ceiling low frequency low frequency w strobe ceiling low frequency w strobe horn ceiling horn 3 1 3 1 2 1 2 1 3 1 3 1 2 1 1 Grille Removal Ceiling Mount All models are for indoor use with a temperature range of 0 to 50 32 to 122 and maximum humidity of 93 RH PROCEDURES Verify New Grille matches the appliance type color lettering 1 Applies to EL series ceiling grilles Strobe Models Note Candela Setting Existing Grille from Appliance Insert 3 16 screwdriver in slot shown and while away from ceiling surface Repeat on opposite if needed See Figure 1 Appliance Settings are Correct New Grille over appliance Apply pressure on both above screw driver slots until Grille Snaps into Grille is attached Candela Setting noted above P85764A 2020 Cooper Wheelock Inc dba Cooper Notification 1 MATERIAL EXTRAPOLATED FROM THIS DOCUMENT OR FROM COOPER WHEELOCK MANUALS OR OTHER DESCRIBING THE PRODUCT FOR USE IN PROMOTIONAL OR ADVERTISING CLAIMS OR FOR ANY OTHER USE DESCRIPTION OF THE PRODUCT S APPLICATION OPERATION INSTALLATION AND TESTING IS USED AT THE RISK OF THE USER AND COOPER WHEELOCK WILL NOT HAVE ANY LIABILITY FOR SUCH USE