DSC NT9010DMK - Installation Manual - English - French - Spanish - Envoy Desk Mount Kit

File Preview
Click below to download for free
Click below to download for free
File Data
| Name | dsc-nt9010dmk-installation-manual-english-french-spanish-envoy-desk-mount-kit-0356492187.pdf |
|---|---|
| Type | |
| Size | 678.31 KB |
| Downloads |
Text Preview
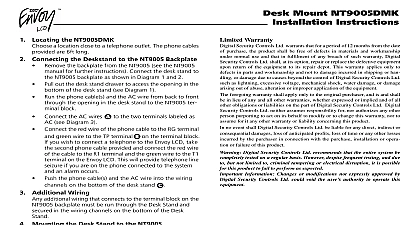
Locating the NT9010DMK a location close to a telephone outlet The phone provided are 6ft long Wiring the Phone Cables and AC see Diagram 1 out the drawer to access the opening in the bot of the Desk Stand the phone cable s and the AC wire from back to through the opening in the Desk Stand the AC wires to the two terminals labeled as the red wire of the phone cable to the RING and green wire to the TIP terminal on the Stand you wish to connect a telephone to the Envoy take second phone cable provided and connect the red of the cable to the R1 terminal and the green to the T1 terminal on the Desk Stand This will telephone line seizure if you are on the phone to the system and an alarm occurs the phone cable s and the AC wire into the wir channels on the bottom of the Desk Stand Mounting the Desk Stand to the NT9010 see 2 3 4 the Wall Mount plate from the NT9010 by follow steps in Diagram 2 the plastic screw from the backplate a flathead screwdriver into the slots and to release the backplate the backplate away from the Envoy and remove posts the 2 round posts of the desk stand into the back of as shown in step in Diagram 3 With the back of the Desk Stand facing you push down on in Desk Stand with your thumbs as shown in step 4 until you hear two clicks The Desk Stand will be properly secured to the NT9010 Please make sure that the battery is connected completing this step this is completed and the unit is in its desired loca plug the phone cable connected to TIP and RING into wall outlet and connect the other phone cable to the if applicable that the unit is set up apply AC power set up devices complete all programming as described in the NT9010 Mount NT9010DMK Instructions the Desk Stand from the unit Diagram 5 the AC transformer and phone cable s the mounted NT9010 and stand it in its upright posi the portion of the Desk Stand that is pointing the Desk Stand upward to release the catches that hold Desk Stand to the NT9010 the Desk Stand away from the NT9010 and remove the Stand posts from the NT9010 Warranty Security Controls Ltd warrants that for a period of 12 months from the date of the product shall be free of defects in materials and workmanship under use and that in fulfilment of any breach of such warranty Digital Security Con Ltd shall at its option repair or replace the defective equipment upon return of equipment to its repair depot This warranty applies only to defects in parts and and not to damage incurred in shipping or handling or damage due to beyond the control of Digital Security Controls Ltd such as lightning exces voltage mechanical shock water damage or damage arising out of abuse alter or improper application of the equipment foregoing warranty shall apply only to the original buyer and is and shall be in of any and all other warranties whether expressed or implied and of all other or liabilities on the part of Digital Security Controls Ltd Digital Security Ltd neither assumes nor authorizes any other person purporting to act on behalf to modify or to change this warranty nor to assume for it any other war or liability concerning this product no event shall Digital Security Controls Ltd be liable for any direct indirect or con damages loss of anticipated profits loss of time or any other losses by the buyer in connection with the purchase installation or operation or of this product Digital Security Controls Ltd recommends that the entire system be tested on a regular basis However despite frequent testing and due to not limited to criminal tampering or electrical disruption it is possible for this to fail to perform as expected Information Changes or modifications not expressly approved Digital Security Controls Ltd could void the user authority to operate this equip R001 Localisation du NT9010DMK un endroit pr d prise t Les t fournis sont d longueur de 6 Raccordements t et CA voir figure 1 le tiroir de fa acc l dans fond du support de table le s cordon s t et le c CA l vers l en les passant par l support de table les fils CA aux deux bornes identifi AC le fil rouge du cordon t la RING et le fil vert la borne TIP du support de vous d brancher un t sur le Envoy le second cordon t fourni et rac le fil rouge la borne R1 et le fil vert la T1 du support de table Ceci permet la saisie de ligne t si le t branch au est en cours d au moment o une se produit le s cordon s t ainsi que le CA l des canaux fil dans la base du Montage du NT9010 sur le support de table voir de table 2 3 et 4 la plaque murale du NT9010 en suivant les la Figure 2 la vis de plastique de la plaque arri la lame d tournevis plat dans la rainure faite la tourner pour lib la plaque arri la plaque arri de la console Envoy et enlevez tiges de montage de la Figure 4 placez les deux tiges de montage rondes du support de l de NT9010 tel que d l la Figure 3 que d l du support de montage face vous et poussez le de table vers le bas avec vos pouces jusqu ce que entendiez deux clics Le support de table est mainte bien fix la console NT9010 Assurez vous que la batterie est bien raccord de compl cette fois que le montage est compl et que l est d branchez le cordon t raccord bornes TIP et RING dans la prise murale et l cor t au t si applicable est maintenant pr appliquez la tension CA les dispositifs et effectuez la programmation tel que dans les manuels du NT9010 R001 Mount NT9010DMK d retirer le support de table de l figure 5 le transformateur CA ainsi que le s cordon s le NT9010 mont sur son support et tenez le verti la portion du support de table dirig vers le haut le support de table vers le haut afin de lib les qui le retiennent la console NT9010 le support de table du NT9010 et enlevez les tiges montage du NT9010 limit Security Controls Lt pendant une p de douze mois partir de la date garantit le produit contre toute d mat et d dans conditions normales d Dans l de cette garantie Digital Controls Lt va lorsqu le juge opportun en cas de probl de fonc r ou remplacer les d d leur retour son de r Cette garantie s seulement aux d la main d et non aux dommages caus lors de l ou de la ni aux dommages dont les causes d le contr de Digital Controls Lt telles que la foudre les surtensions les chocs m les d ou tout dommage provenant d de