Kidde 3101058 R02 FSRRM24 Remote Relay Module Installation Sheet

File Preview
Click below to download for free
Click below to download for free
File Data
| Name | kidde-3101058-r02-fsrrm24-remote-relay-module-installation-sheet-4375908216.pdf |
|---|---|
| Type | |
| Size | 788.39 KB |
| Downloads |
Text Preview
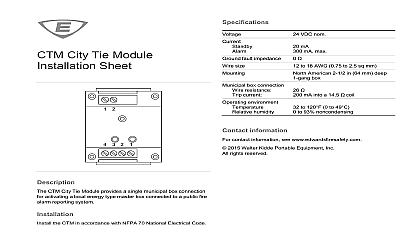
Remote Relay Module Sheet OFF ON Description 1 Common alarm 2 Common trouble 3 Common supervisory 4 Common monitor 5 Common power Only one FSRRM24 module configured for common relay is allowed per peripheral group peripheral group 1 peripheral group 2 3 Group selection jumper Only three FSRRM24 modules are allowed per peripheral on 3 and 5 zone control panels Only four FSRRM24 modules allowed per peripheral group on 10 zone control panels 4 Output selection jumpers J1 to J5 to 2 to 3 output contact the FSRRM24 according to the instructions provided Make sure all power is disconnected from the panel installing Observe static sensitive handling practices FSRRM24 provides five Form C relays that you can as common relays zone relays or as programmable to use with F series fire alarm control panels In you can configure the relays as dry contact relays or 24 VDC output relays provide visual indication when each relay is energized when the FSRRM24 is disabled FSRRM24 includes a plastic snap track for mounting in an cabinet remote relay modules are configured using the described in the tables below 1 Disable output jumper all relays all relays 2 Module type jumpers OFF OFF Five programmable relays common Description or zone OFF Five zone relays zones 6 to 10 This is ignored on 3 zone and 5 conventional F Series control ON Five zone relays zones 1 to 5 2013 UTC Fire Security All rights reserved 4 3101058 REV 02 REB 25JAN13 1 FSRRM24 mounting 2 Data and power wiring remote track panel 24 VDC control panel or power supply 3 install the FSRRM24 Mount the snap track on the MFC A cabinet as shown in 1 Only two FSRRM24 modules are allowed per cabinet the bottom edge of the FSRRM24 into the snap then press the top edge in until it snaps into place Configure the jumpers Verify that all wiring is free of opens shorts and ground Connect the data and power wiring as shown Figure 2 Energize the panel and confirm that all relays are in the state before connecting the field wiring Normally all relays are deenergized If a jumper is on JP5 relays 1 and 5 are energized Connect the relay output wiring as shown Figure 3 Make connection will not adversely affect controlled devices elevators fans etc FSRRM24 remote relay modules will not operate until detected by the control panel For more see the technical reference manual listed inside control panel door JP3 JP4 JP5 3 Relay output wiring 2 4 5 C NO C NO C NO 3 JP3 JP4 JP5 All wiring is supervised and power limited AUX power supplied by the control panel can exceed A If more than 0.5 A is required you must use a and regulated 24 VDC auxiliary booster supply that is UL ULC Listed for fire protective systems 4 3101058 REV 02 REB 25JAN13 powered from an external supply the supply must be in the same room as the control panel and their VDC commons wired together Relay outputs are not supervised and do not provide limiting Connect relays only to power limited Terminal marking indicates contact position when the relay deenergized capacitance resistance fault impedance 0 outputs to 27.3 VDC mA zone relay operation mA common relay operation mA max max rating size environment humidity zone or programmable and dry or 24V output via jumper selection C Vdc at 1 A resistive load to 18 AWG 0.75 to 2.5 sq mm cabinet to 49 32 to 120 to 93 noncondensing 3101058 REV 02 REB 25JAN13 4 4 3101058 REV 02 REB 25JAN13